App
Features
Window modes, session recording, system tray, notifications, web remote, themes, updates, and feedback.
Window Modes
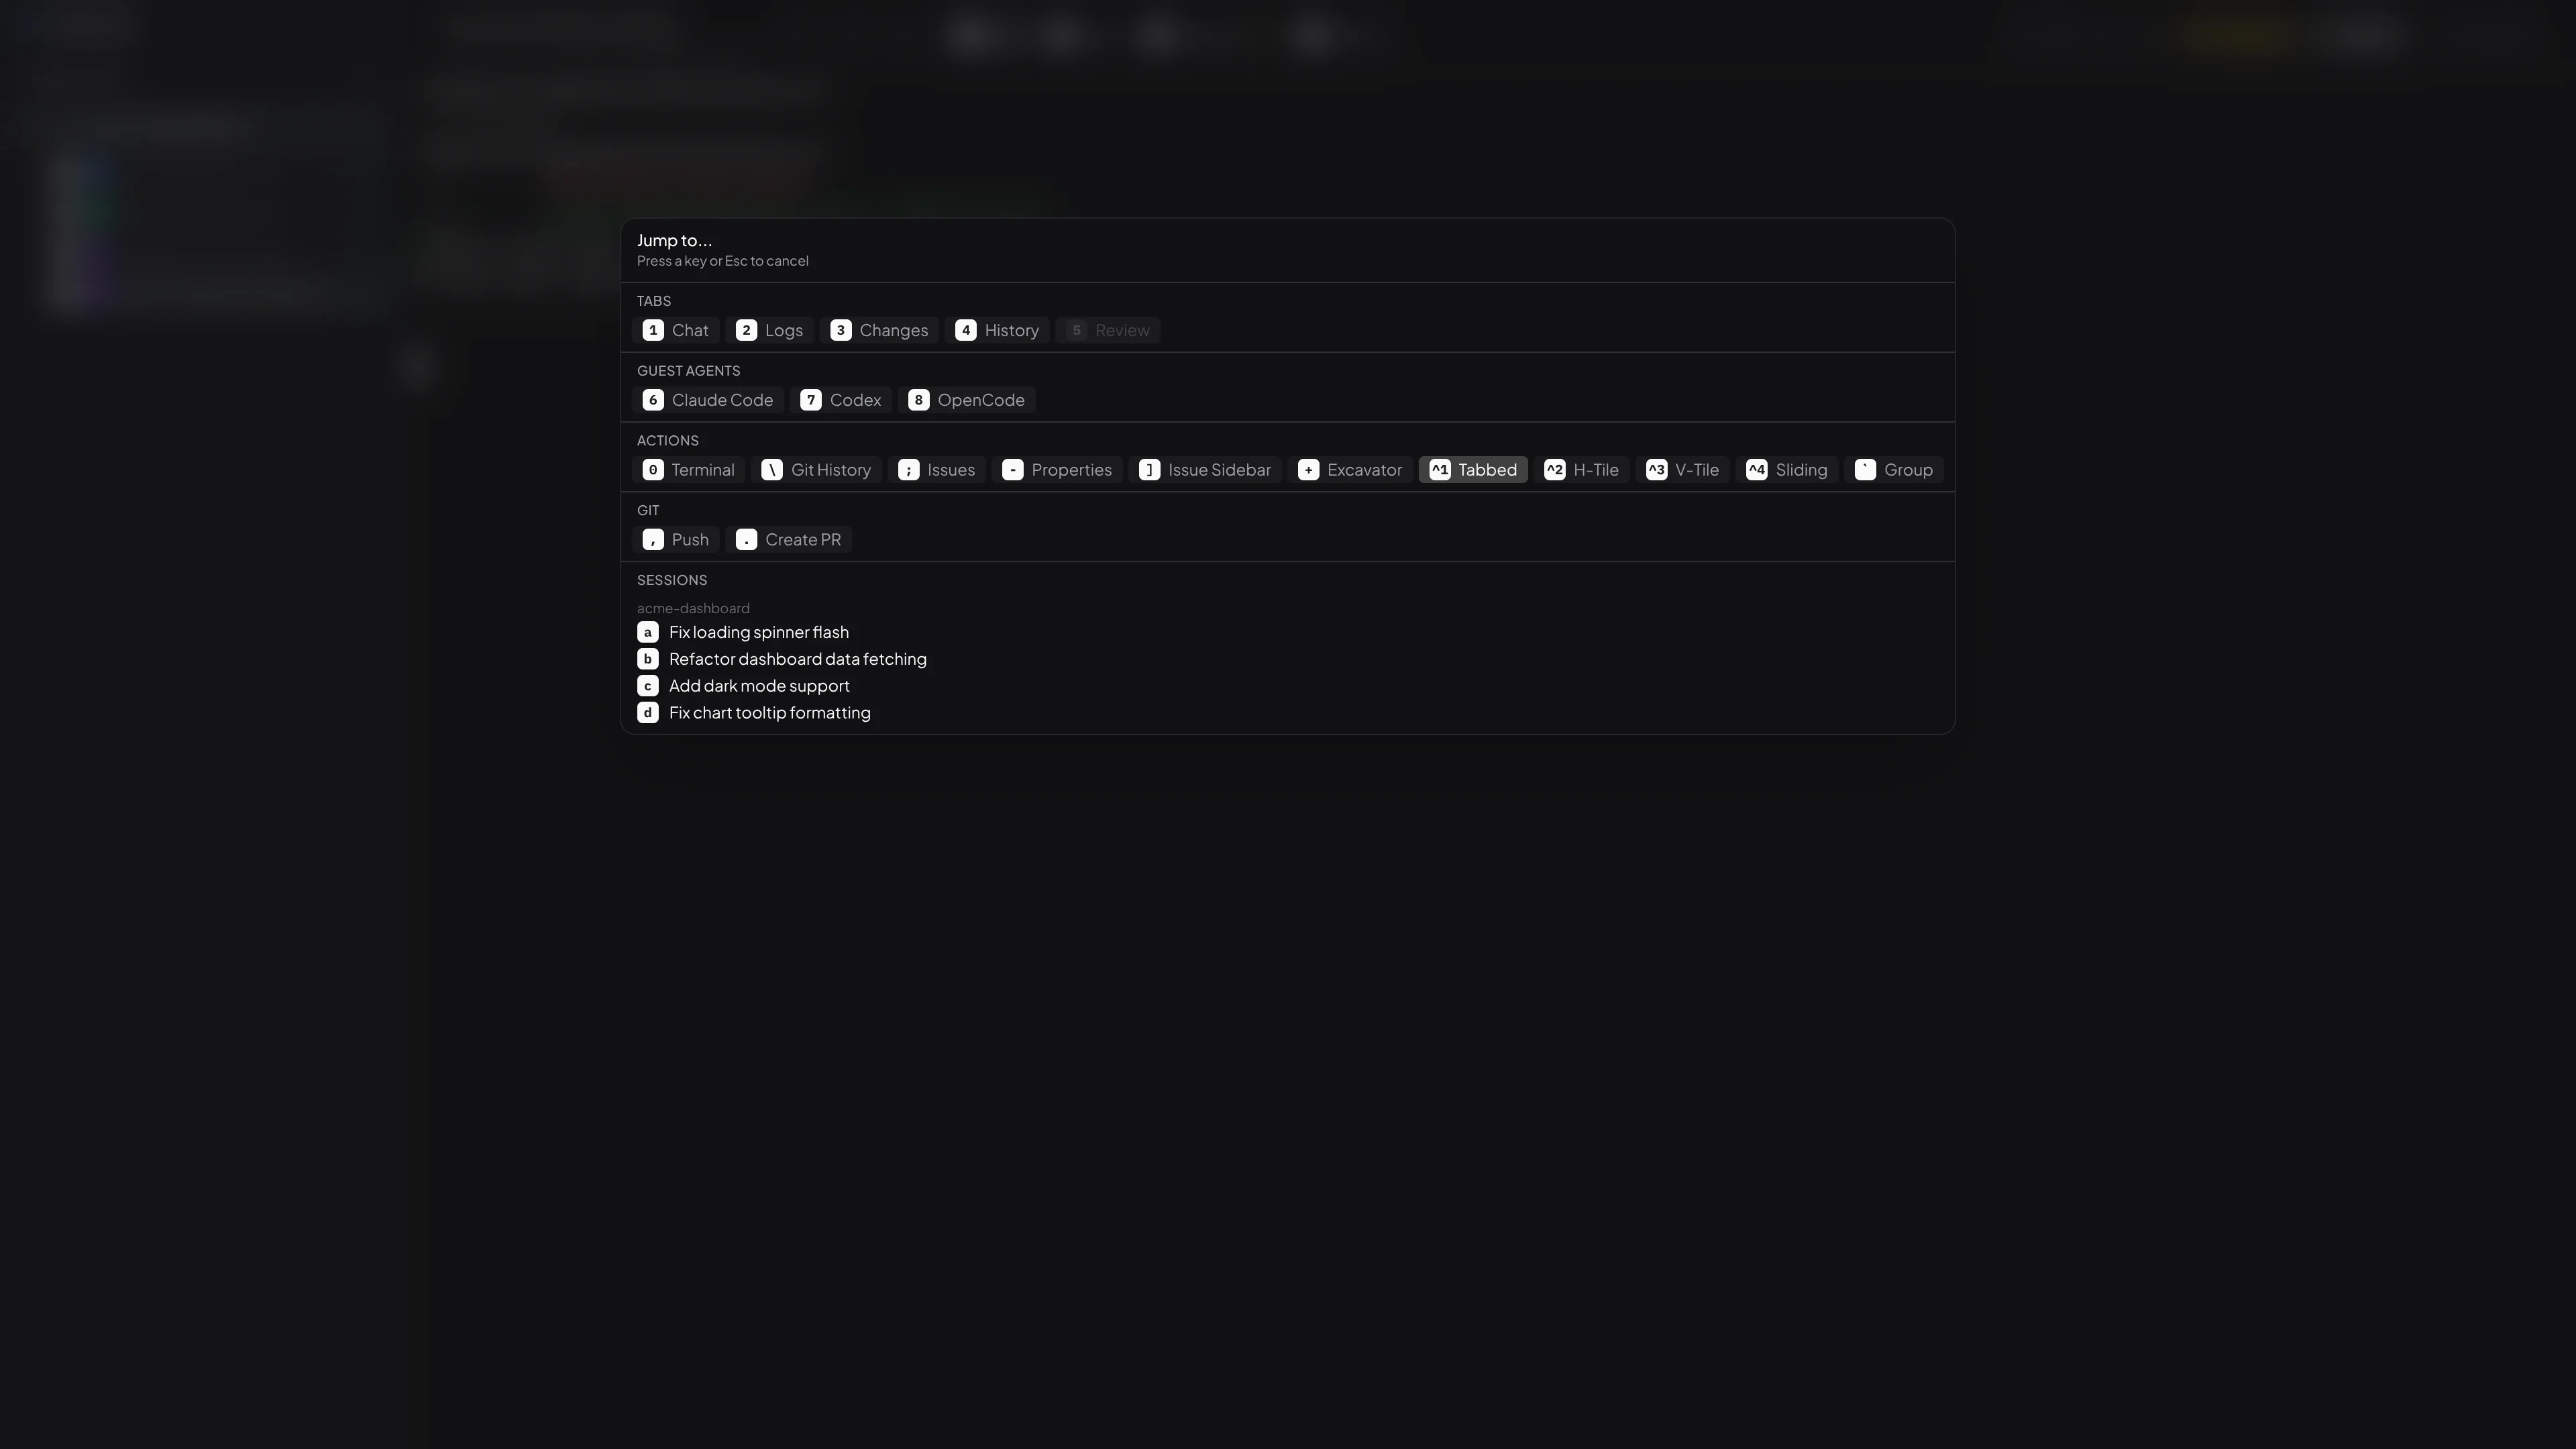
Sessions support tabbed, tiling, and sliding layouts for arranging terminals, panels, and sidebars. Built-in shell terminals can be opened alongside your agents in any mode. Press Mod+\ to cycle through layouts, or pick one from the session header dropdown.
See the Window Modes guide for a full walkthrough of each layout, shell terminals, and all related shortcuts.
Session Recording
Sessions are automatically recorded on Pro plans. Every keystroke and line of output is saved so you can replay any session later, exactly as it happened.
Live Rewind
While a session is running, press Mod+D or click the pause button in the top-right corner of the terminal to freeze the live view. Use the playback controls to rewind, fast-forward, and seek through everything that has happened so far. The timeline shows wall-clock timestamps so you can orient yourself in the session's history. Hover over the seek bar to see the exact time at any point. Press Escape or click LIVE to jump back to the current moment and resume working.
Tick marks on the scrub bar show every checkpoint on the session's current timeline, with a brighter ring around the latest published point so you can see where each restore point lines up with the recording.
On Pro, when you open the same session from another device its recording comes with it, so a session you recorded on one machine is available for replay anywhere you can open the session.
While you are paused, the timeline continues to grow as the agent works. The LIVE button pulses to let you know you have fallen behind. Long idle periods are compressed in the timeline so you can focus on what matters.
Use Continue From Here to create a new child session from the nearest resumable checkpoint at or before the point you have selected. This forks the session history instead of rewriting the original session in place.
Keyboard shortcuts while in DVR mode: Space to play/pause, Left/Right to skip 10 seconds, [/] to change speed, ,/. to jump between chapters.
Reviewing Past Sessions
Recordings are preserved when you delete a session. Open the deleted sessions list, choose Recording, and replay the session without restoring it.
Deleted-session recordings also support Continue From Here, which creates a new child session from the nearest resumable checkpoint at or before the selected point while leaving the deleted session unchanged.
Chapters
Each time you reactivate a session, a new chapter is added to the recording. Use the chapter navigation buttons to jump between activations.
Sharing Recordings
Export a recording and send it to a teammate. They can open it in Taskeract via File > Open Recording... to replay it on their own machine. No cloud storage is involved - recordings are simple files you share however you like.
System Tray
Taskeract places an icon in your system tray so you can monitor session status at a glance, even when the app is in the background.
Status Dots
The tray icon shows a colored dot overlay when sessions need attention:
- Yellow dot - a session is waiting for a permission response.
- Green dot - a session has completed its task.
- No dot - all sessions are either idle or actively working.
If both conditions exist simultaneously, the yellow (permission) dot takes priority.
On macOS, the same status also appears as a badge on the dock icon. On Windows, a colored overlay appears on the taskbar button. These update automatically alongside the tray dot.
Tray Interaction
Left-click the tray icon to bring the Taskeract window to focus. Right-click to access the context menu with Show Taskeract and Quit. On Linux with AppIndicator, left-click may show the context menu instead - use the Show Taskeract menu item as a fallback.
Close to Tray
When the Close to tray option is enabled in Settings > Appearance, closing the window hides Taskeract to the system tray instead of quitting. The app continues running in the background and can be reopened by clicking the tray icon. Use Quit from the tray menu to exit completely.
When Web Remote is active, close-to-tray is enabled automatically so that closing the window doesn't disconnect remote clients.
Tray Options
The tray icon style (color, black, or white) and whether the tray icon is shown at all can be configured in Settings > Appearance.
Interface Scale
Use Settings > Appearance > Interface Scale to resize the desktop app UI. The setting is local to the current device, so a laptop and desktop can use different scale values.
Notifications
Taskeract can send desktop notifications when agents need attention or finish working. This is useful when you're multitasking and don't have the app in the foreground.
Notification Events
Notifications are triggered by the same state changes that drive the system tray status dots:
- Permission needed - an agent is waiting for you to approve or deny a tool call, file write, or command execution.
- Task completed - an agent has finished its work and the session is ready for your review.
Notifications include the session title so you know which session needs attention. If you're already viewing the session that triggered the event, no notification is sent.
Configuration
Notifications are enabled by default. You can toggle them in Settings > Privacy, where there is a master toggle and individual toggles for each event type. See the Notifications section in the Configuration guide for the config.yaml reference.
Web Remote
Web Remote lets you access Taskeract from another device on your local network using a web browser. Monitor sessions, review changes, and interact with your agents from a tablet or second computer without installing anything.
Getting Started
Open Settings > Remote and toggle Web Remote Access on. Taskeract generates login credentials automatically and starts a local server. The settings panel shows the URL, username, and password - open the URL in a browser on any device connected to the same network and sign in.
Credentials
A username and password are generated for you the first time you enable Web Remote. You can change them in the Remote settings at any time - new credentials take effect immediately.
One Device at a Time
Only one browser can be connected at a time. If you open the Web Remote on a new device, the previous device is disconnected automatically. This makes it easy to switch between devices - just open the URL wherever you are.
Background Behavior
While Web Remote is active, Taskeract keeps running in the background when you close the window. The system tray icon stays active so you can reopen the window at any time. These overrides apply automatically and your saved preferences are restored when you turn off Web Remote.
Requirements
The port is configurable in the Remote settings (default: 9800). Both devices must be on the same local network.
Themes
Taskeract supports VS Code-compatible color themes, giving you access to thousands of community-created themes. Themes control the colors of the entire application - backgrounds, borders, text, syntax highlighting, the terminal, and semantic UI elements like success/error indicators.
Built-in Themes
Taskeract ships with two built-in themes:
- Taskeract Dark - the default dark theme with cyan accents, designed for extended coding sessions.
- Taskeract Light - a clean light theme for bright environments.
Theme Picker
Open Settings (from the application menu or Mod+,) and navigate to the Theme tab. You'll see built-in themes and any installed themes grouped by extension, each with color swatches showing background, accent, and semantic colors. Click any theme to apply it immediately. The active theme is highlighted with a badge.
Browsing the Registry
Below your installed themes, a search bar lets you discover and install themes from the Open VSX registry - a vendor-neutral marketplace for VS Code extensions. Open Settings with Mod+, and click the Theme tab to get started.
Type in the search bar to find themes by name, publisher, or description. Click any result to see its full detail in the right panel - extension icon, publisher info, version, download count, rating, license, repository link, and the full README with screenshots. After installation, the detail panel lists the extension's theme variants with individual Apply buttons.
Installing & Uninstalling
Select an extension from the search results and click Install. Taskeract downloads and installs the theme locally. To remove an extension, click Uninstall in either the search results detail panel or from the installed themes list on the left. If the active theme belongs to the extension being removed, Taskeract reverts to the default dark theme.
Updates
Windows & macOS (DMG)
Taskeract checks for updates automatically. When a new version is available, a notification appears in the bottom-right corner of the app. Click Update to download and install it - Taskeract restarts automatically when the installation is complete.
macOS (Homebrew)
If you installed via Homebrew, updates are managed through Homebrew instead. The in-app notification does not appear for Homebrew installations.
brew upgrade taskeractLinux
On Linux, updates are handled by your package manager. There is no in-app updater. If you installed via APT or DNF and haven't set up the Taskeract repository yet, follow the installation instructions first.
# Debian / Ubuntu
sudo apt update && sudo apt upgrade taskeract

# Fedora / RHEL
sudo dnf upgrade taskeract

# Arch Linux (AUR)
yay -Syu taskeract-bin
Feedback & Privacy
Send Feedback
To send feedback, open the Help menu (macOS) or the Taskeract menu (Windows/Linux) and select Send Feedback. This opens a quick survey where you can share suggestions, report issues, or tell us what you think. Responses are associated with your account so we can follow up if needed. The feedback option works regardless of your telemetry preference.
You can also submit feedback from the web. Sign in to your account and go to Feedback on your dashboard. Choose a category (bug report, feature request, or general feedback) and describe the issue. All submissions are reviewed by the development team.
Privacy Settings
Open Settings > Privacy to control what data Taskeract shares:
- Send usage data - when enabled (the default), Taskeract sends usage events like session and project creation to help improve the product. Turn this off to stop sending usage analytics. App open/close, feedback, and error reports are always sent so we can diagnose crashes regardless of this setting. Error reports include the error type and message text, application version, OS, and machine identifier; we never collect your code, your prompts, or the contents of your repositories. See the Privacy Policy for the full payload description.
- Diagnostic mode - records your UI interactions in depth for diagnostic review. This should remain off unless Taskeract support asks you to enable it to help diagnose a specific problem. In preview and beta builds, diagnostic mode is always on and the toggle is disabled.
Both settings persist in your config.yaml and take effect immediately.
Sandbox
Sandbox mode restricts a session so the agent can only access the project it's working on. The agent cannot read files outside the project directory, access other projects, or connect to websites not on your allow list. This is available on Pro plans.
Creating a Sandboxed Session
Each agent in the picker has a shield icon on its right side. Click the shield to start that agent in sandbox mode, or click the agent name to start normally. In the keyboard shortcut modal, hold Shift while pressing an agent's number to start it sandboxed. Sandboxed sessions show a small shield icon on their sidebar badge and next to the agent name in the session header.
What the Agent Can Access
A sandboxed agent can read and write files in its session workspace and its own configuration directory. It can also read files you've added to the allowed paths list (like SSH keys or package manager configs) and connect to domains on the allowed domains list (like package registries). Domains required by agents to function (API endpoints for Anthropic, OpenAI, and others) are always allowed automatically. Everything else is blocked.
Configuration
Open Settings > Sandbox to see which sandboxing method your system supports and to manage your allow lists. You can add file paths the agent should be able to read, domains it should be able to reach, and environment variables it should receive. These settings apply to all sandboxed sessions. See the Sandbox section in the Configuration guide for the config.yaml reference.
Session Sharing
Session Sharing lets you invite other Taskeract Pro users into a live session. All participants see the same terminal output in real time. The host controls who can type into the terminal.
Sharing & Joining
Right-click a session in the sidebar and choose Share Session... to generate an invite code. Share the code and token with your teammate. They can join via Taskeract > Join Shared Session... or Ctrl+Shift+J. Both host and guest must be on a Pro plan.
Write Access
Guests join in read-only mode. The host can grant write access per guest from the sharing dialog. Writes are only forwarded when the host is actively viewing the shared session - if the host switches to another tab, guest input is paused until they return.
Security
All session data is end-to-end encrypted - the relay server cannot read your data. Invite tokens are randomly generated and expire with the session. Both participants' subscriptions are verified independently. Sessions auto-expire after 24 hours.
See the full Session Sharing guide for details on guest management, panel forwarding, and security.