Git
Workflows
Push branches, create pull requests, resolve merge conflicts, review PRs inline, manage issues, and rebase - all without leaving the app.
Git Integration
Taskeract has a comprehensive built-in git workflow. Review changes, push branches, create pull requests, rebase, and merge - all without leaving the app.
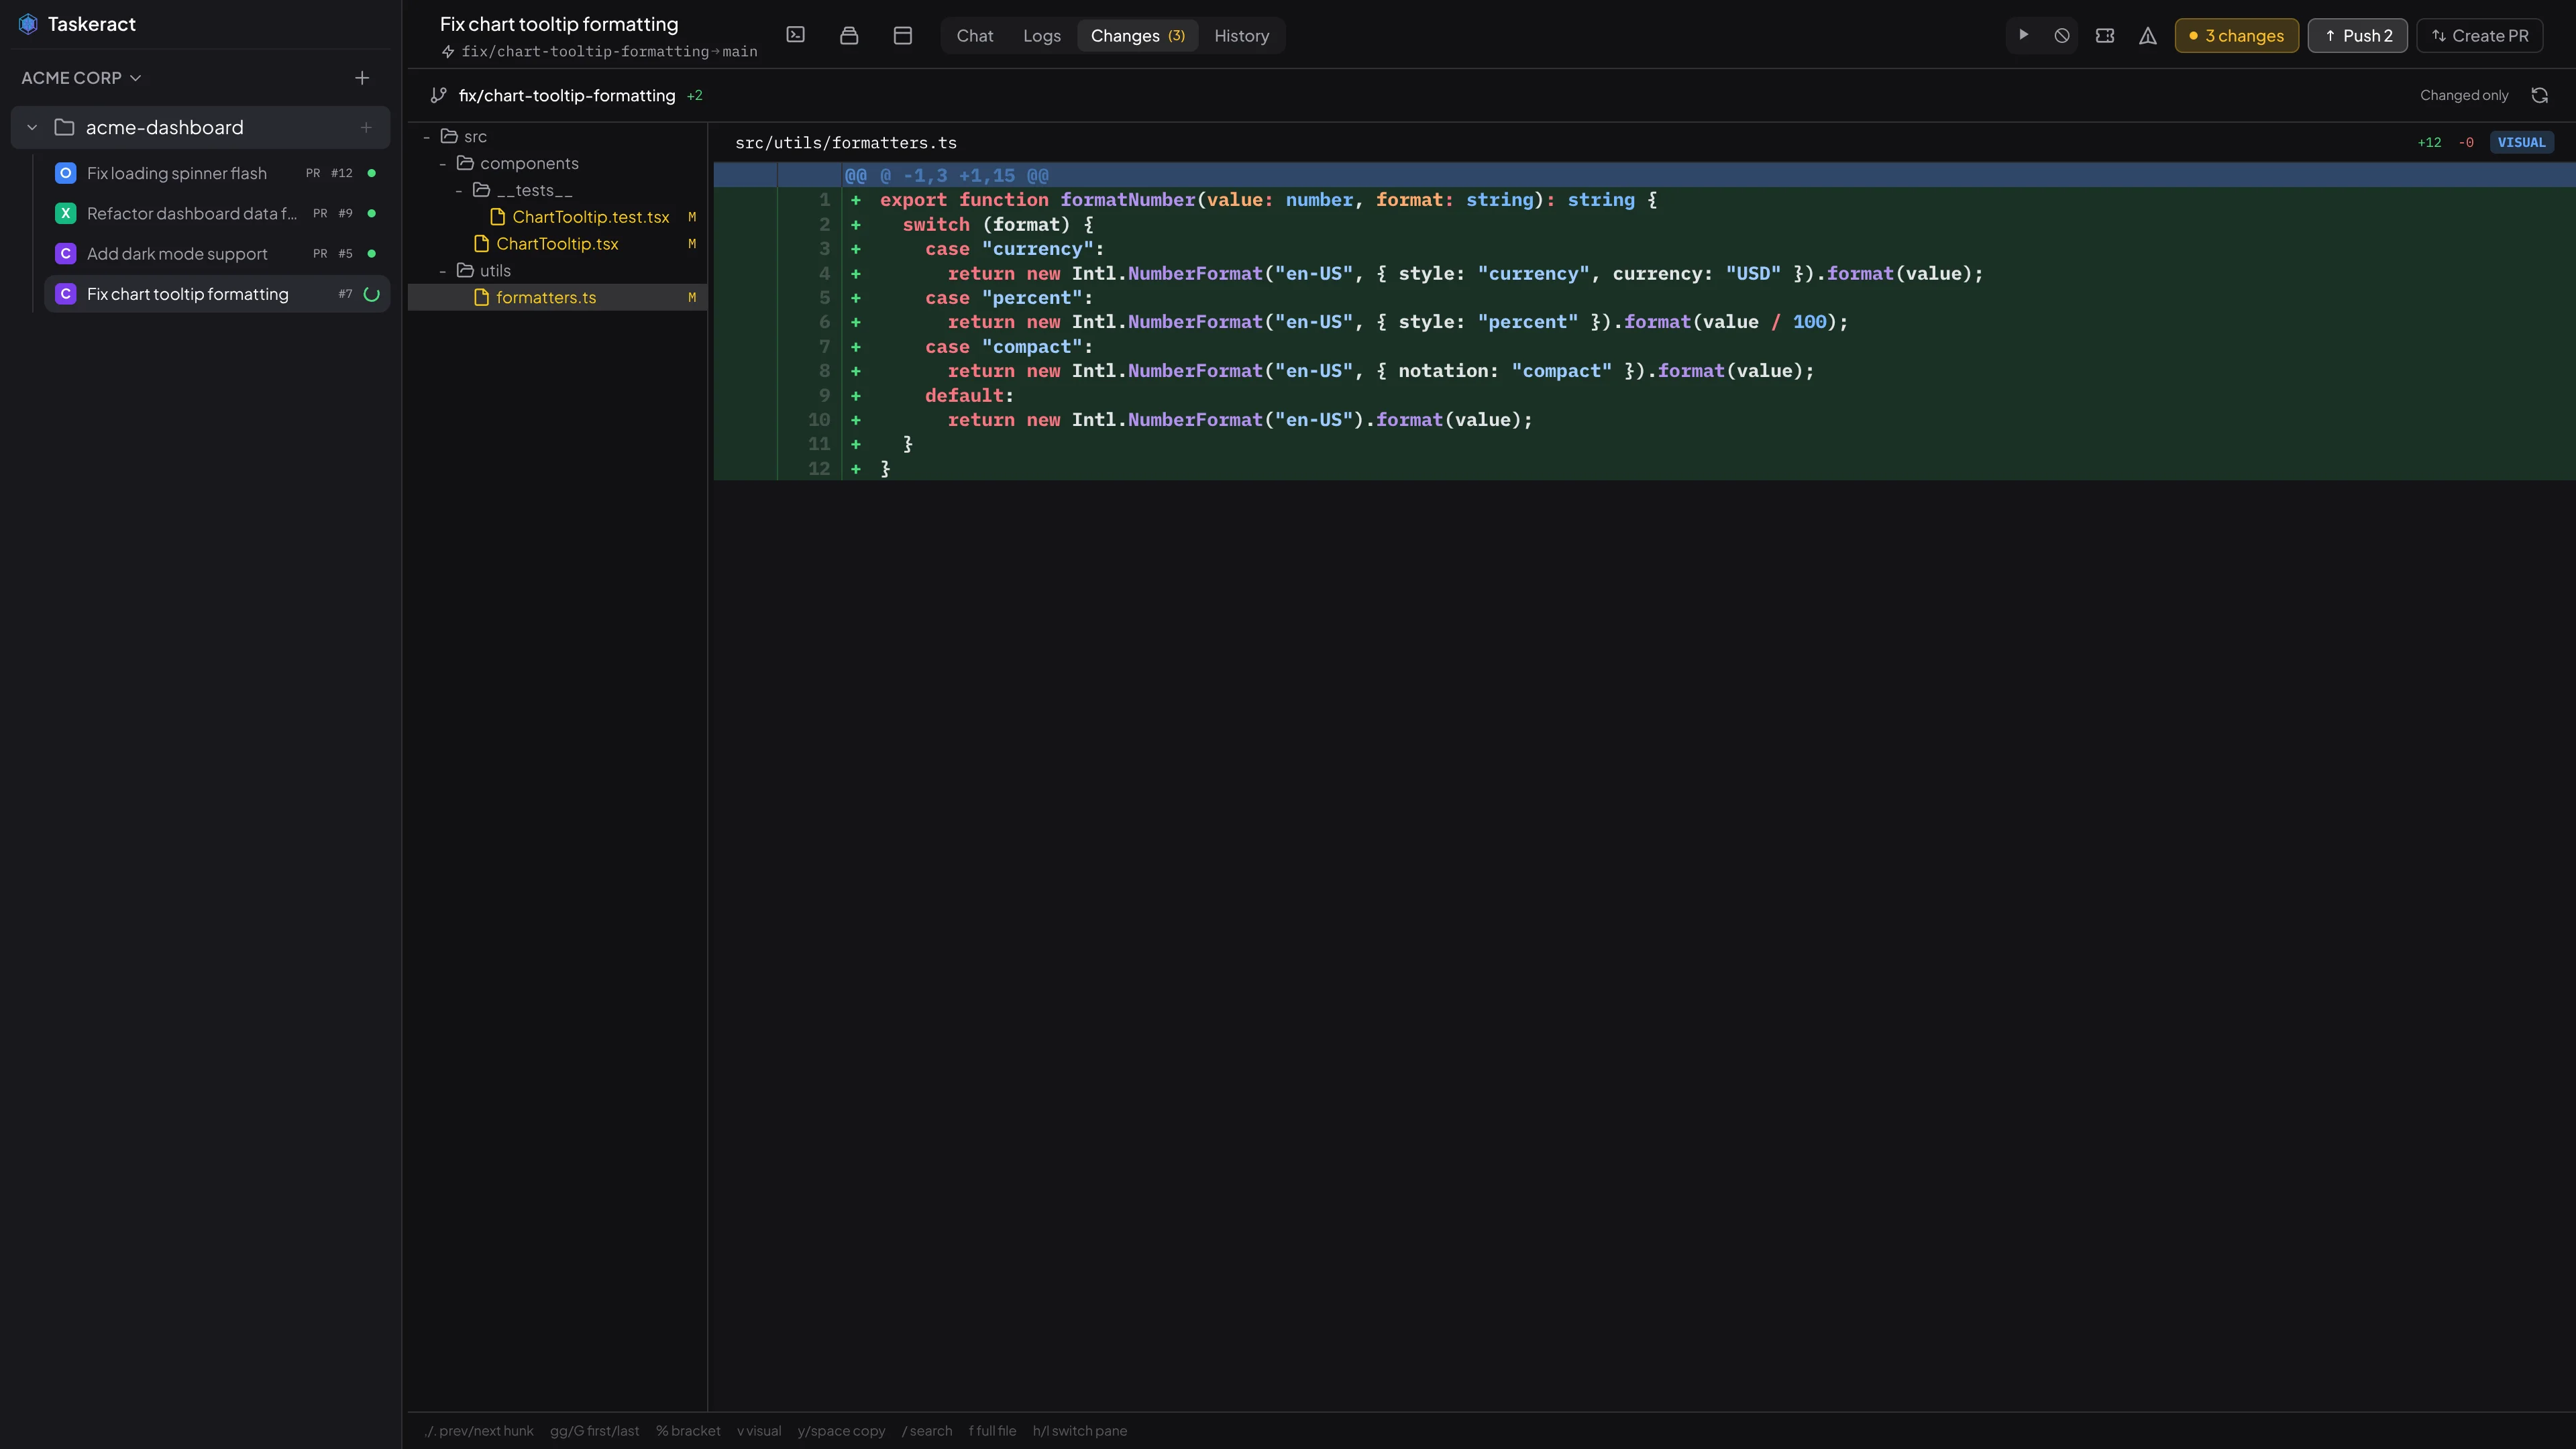
Changes View
The Changes tab shows all files modified in the session's workspace as a file tree with color-coded status indicators. Select any file to view a syntax-highlighted diff with line numbers. Image files are displayed as a visual preview. Use vim-style keyboard navigation (j/k, gg/G, %) to browse changes, v for visual selection mode, and y or Space to copy selected lines to the clipboard. Press f to toggle between showing only changed hunks and the full file with changes highlighted in context.
Diffs default to a structural view that aligns matching code across the two sides. See Semantic Diff & Merge for the full behavior.
Push & Integration
Push the session's branch directly from within Taskeract using the header button or the Mod+P shortcut. The published branch always reflects the current session state as a single commit on top of the base. If the remote branch only contains Taskeract publishes, republishing replaces it with the selected checkpoint; if someone added commits outside Taskeract, the app asks whether to import those commits into the timeline or discard them before it overwrites the branch. The Publish button only appears when there is something new to publish: a clean workspace at a checkpoint that has not yet been pushed. With uncommitted work, the "n changes" button takes its place so you can save a checkpoint first.
When you're ready to integrate (Mod+M), two modes are available:
- Pull Request (default) - create pull requests on GitHub, GitLab, or Bitbucket against the base branch without switching to a browser. Once a PR exists, Taskeract displays a badge linking to it and automatically refreshes its status in the background. The badge color reflects the PR state: green for open, purple for merged, and red for closed. When a PR is merged, the session header shows an "Up to date" badge and hides integration actions that no longer apply.
- Merge & Push - merge the session branch directly into the base branch and push to the remote. The session branch is cleaned up automatically. This is useful for teams that prefer a simpler workflow without pull requests. The merge dialog includes a Close session after merge checkbox that automatically deletes the session after a successful merge. When that is enabled, Taskeract also offers a remembered Squash into one commit option plus an editable commit-message field. Taskeract asks the session's agent for a synthesized default subject line, and you can change it before merging. If you have not chosen a squash preference for the project yet, the option is selected by default. A Promote after merge checkbox can automatically promote the development branch to production after the merge completes. These preferences are remembered per-project.
The integration mode is configured per-project in the Git tab of Project Properties.
The active branch strategy can also disable push, pull-request creation, or merge controls entirely. Review and inspection workflows still get diffs, PR context, and history, but publish actions stay hidden unless the strategy allows them.
Agent-Assisted PRs & Merges
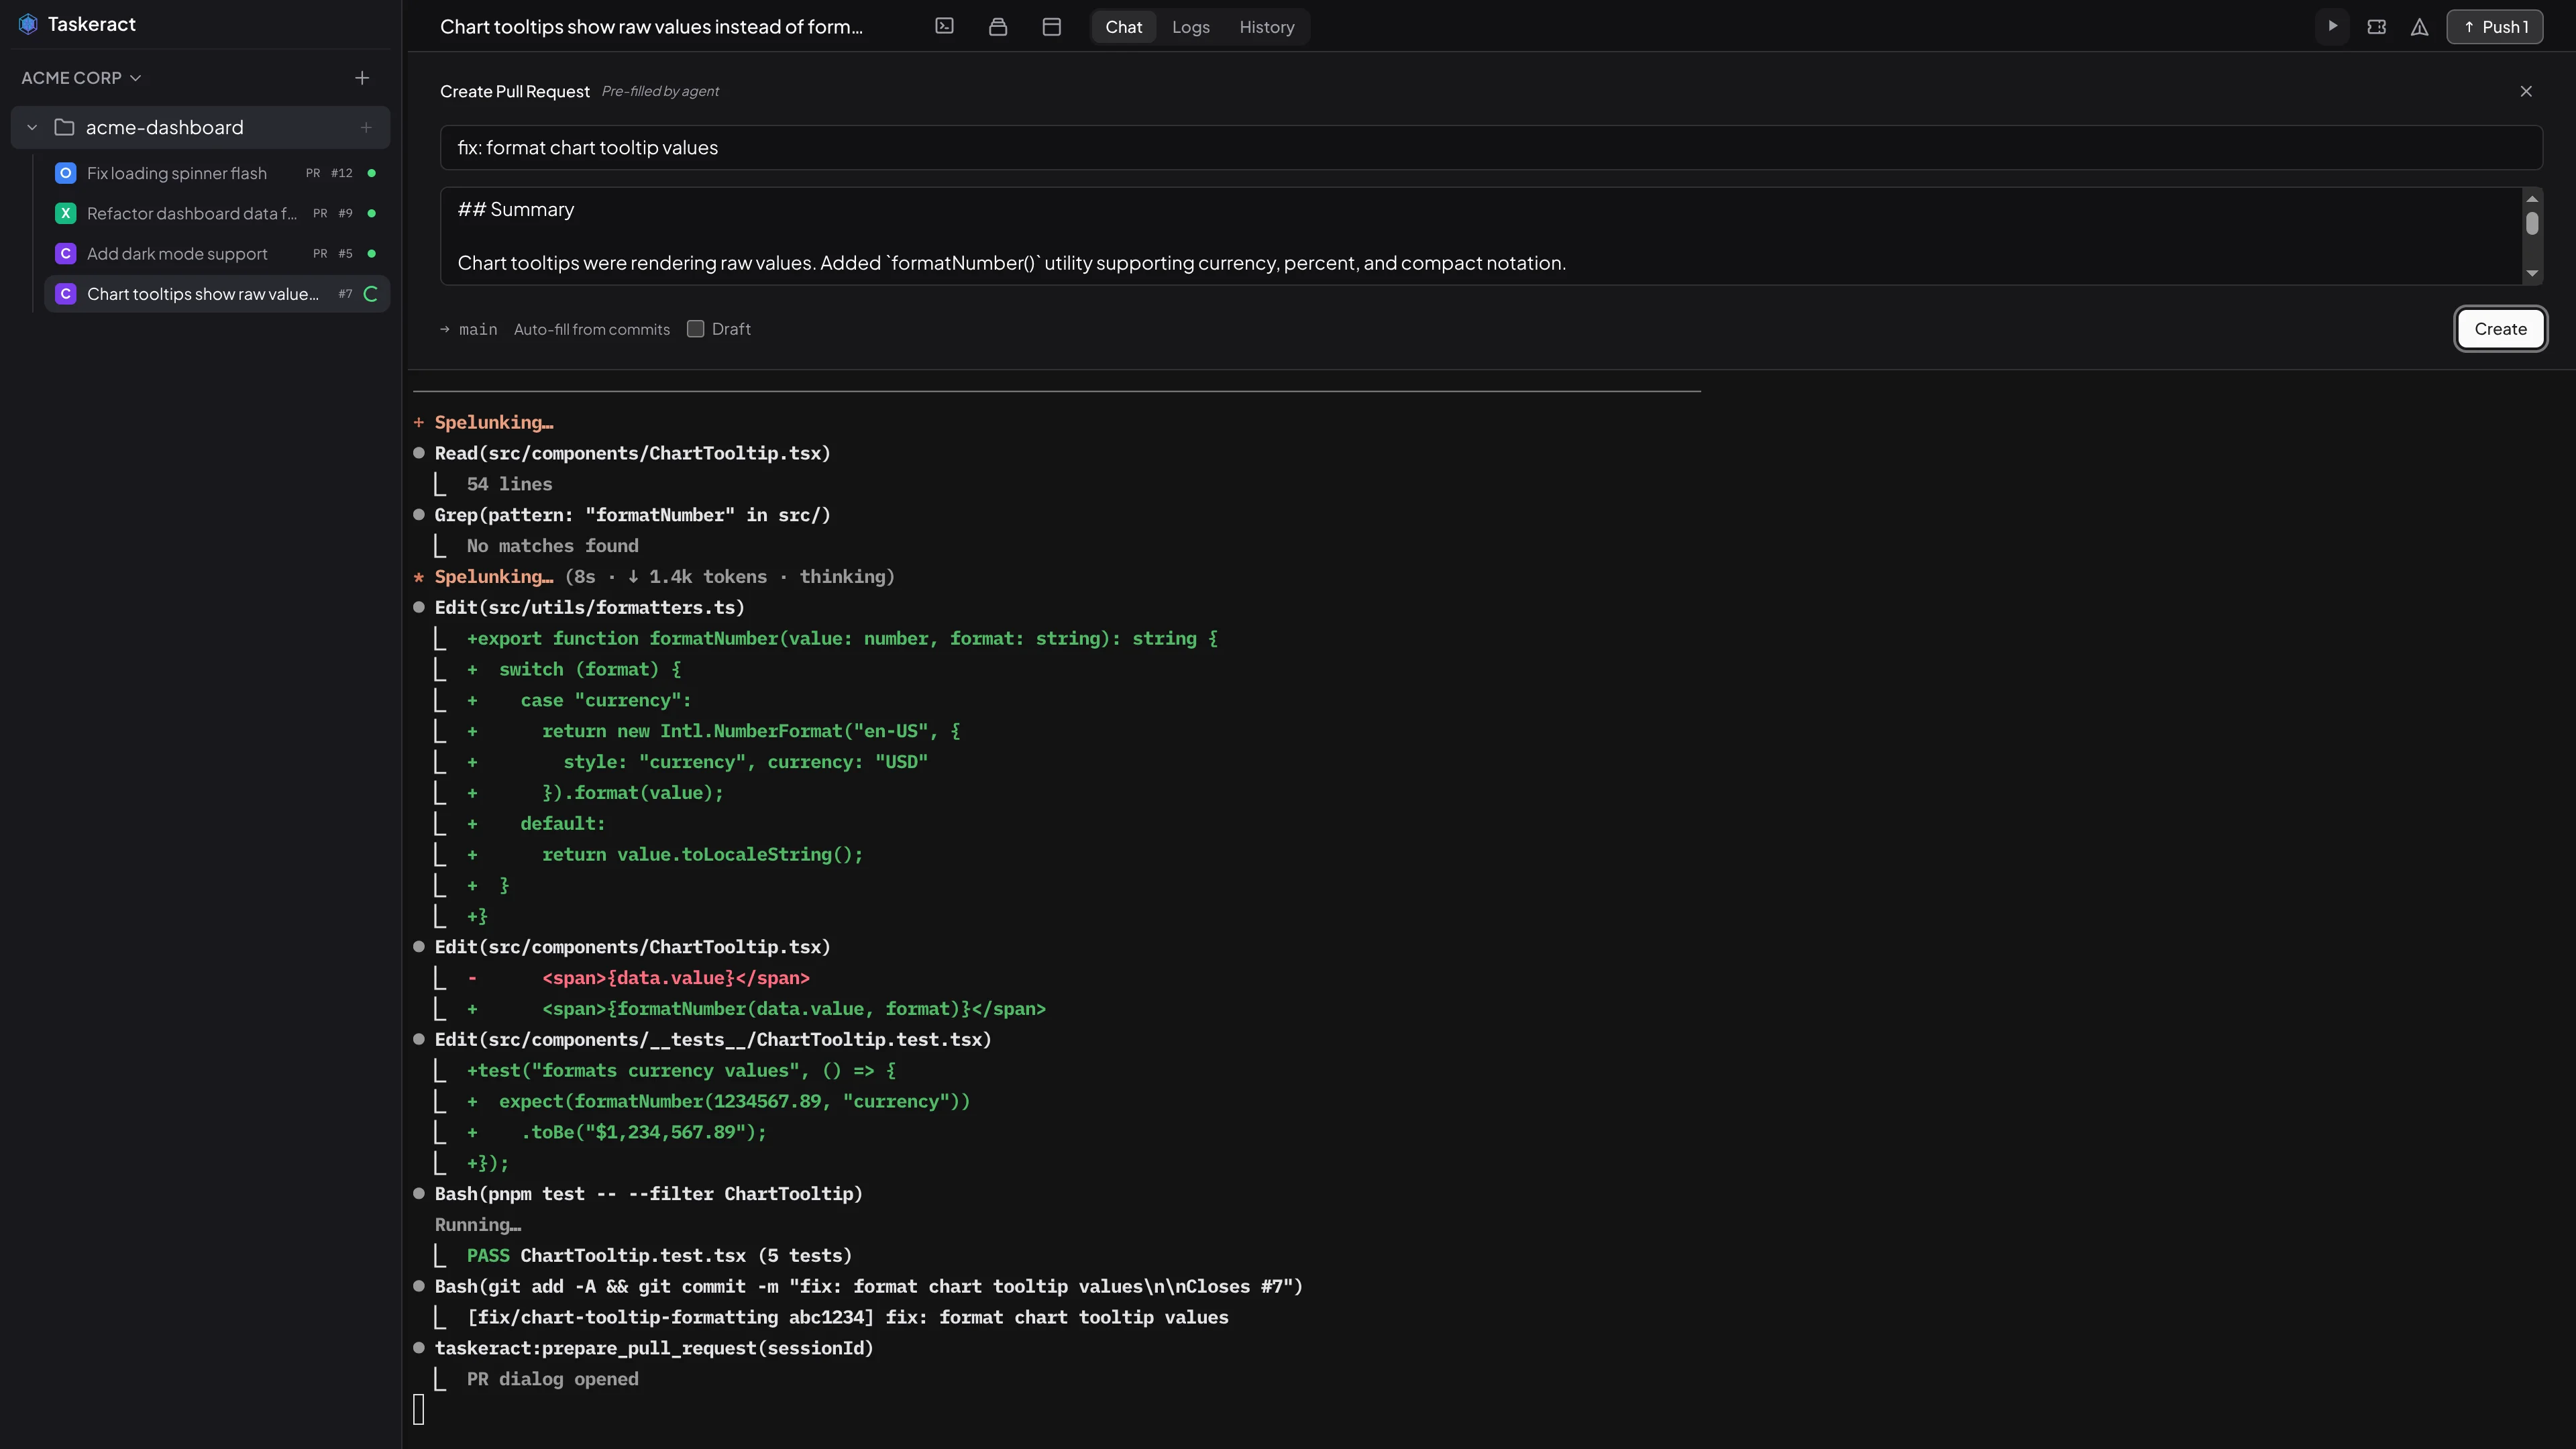
When you ask your agent to "create a PR" or "merge this work," it opens the dialog with the title and description already filled in based on the work it did. This happens automatically - no setup required. The agent has the best context about what changed and why, so the pre-filled content is typically more descriptive than what you'd write by hand.
If you open the PR dialog yourself instead, an Auto-fill from commits button generates a title and description from your branch's commit history. For a single commit, the commit message becomes the title; for multiple commits, the session title is used with a bulleted list of commit messages as the description.
Agents can also pull remote changes when the branch falls behind. Ask your agent to "pull the latest changes" or "rebase onto main" and it will fetch from the remote and integrate the changes using merge or rebase. If conflicts arise, Taskeract detects them automatically and switches to the conflict resolution view.
Base Branch
Each session has a base branch that determines where changes are measured from and where pull requests target. It defaults to the project's configured development branch (or auto-detected from the repository). Click the base branch indicator to open a branch picker showing all remote branches and any local-only branches. Selecting a different base fetches the latest remote refs (when available) and resets the session branch to the new base. This is only allowed before any commits have been made on the session branch.
Keeping in sync with base
When the base branch advances on the remote, an amber dot appears next to the session in the sidebar and an Update from base pill takes the slot in the session header where Publish, Create PR, and Merge & Push usually live - those actions are gated until the session is brought forward. The update never runs on its own; Taskeract waits for you to click the pill (or click the base node in the History timeline) to start. See Base Sync in the checkpoints docs for the full walk: how the timeline replays onto the new base, how conflicts are resolved per-checkpoint, dropping branches before starting, and the one-time picker that repairs sessions from before anchor tracking shipped.
When someone else on your team starts an update on a session you can also see, an amber pulsing dot appears next to that session in the sidebar and a banner pins to the top of the session view explaining that another device is in the middle of the update. Hold off on changes to that session until the banner clears.
Background Sync
Taskeract periodically fetches from the remote in the background (when one exists) so your git status and PR information stay current. When a fetch completes, the changes view refreshes automatically. If your machine goes offline, background sync pauses automatically to save battery and an Offline indicator appears at the bottom of the sidebar. Sync resumes when connectivity returns.
Workspace Isolation
Branch strategies let Taskeract create or reuse workspaces automatically for implementation flows. When a strategy provisions a workspace, it is a lightweight checkout of your repository, so multiple agents can work on the same project simultaneously without interfering with each other or your working directory. Branches can be renamed directly from the session header.
Semantic Diff & Merge
Diffs and merges in Taskeract are structural, not just textual. They look at the shape of your code, not only the order of its lines, so reformats, renames, and moves stop being noise.
Semantic Diff
Switch between Semantic and Unified views using the buttons at the top of the diff (t in a session's Changes tab, Shift+D in git status, commit detail, and PR review). Semantic places original and modified side by side and aligns matching code even when it has been reformatted or renamed. Blocks that moved are labeled so you can see where they went. Unified shows a single column with added and removed lines marked. Your choice is remembered per view.
In the Semantic view, long stretches of unchanged code between edits collapse into a compact marker row showing the line range and the enclosing function or class name on each side, with a few lines of context kept visible around every change. Click the marker to expand a region and click it again to re-collapse.
Generated files such as package-lock.json, yarn.lock, Cargo.lock, and minified bundles fall back to the Unified view automatically with a note at the top of the diff.
Semantic Merge
The same structural understanding powers merges and base-branch replays. When two branches change overlapping code, Taskeract reasons about which structures match between the three sides instead of treating each line independently the way a textual three-way merge does. A rename on one side and an edit on the other no longer turns into a wall of conflicts. A reformat does not look like every line changed.
The same engine is what lets base sync replay your timeline onto a moved base tip in place. Your saved checkpoints are reapplied on top of the new tip without forcing you through a manual rebase, and the conflicts that do surface are the conflicts that actually matter.
When conflicts cannot be resolved automatically during a base update, the update view pauses on the affected checkpoint with a per-file decision: keep yours, take the new base's version, or hand-resolve in your external 3-way merge tool.
Git History Viewer
Taskeract includes a full git history viewer for browsing your repository's commit graph. Open it from Jump Mode (Mod+G then \) or from the session context. Pressing \ again returns you to the session you were working in (or the welcome page if none was active).
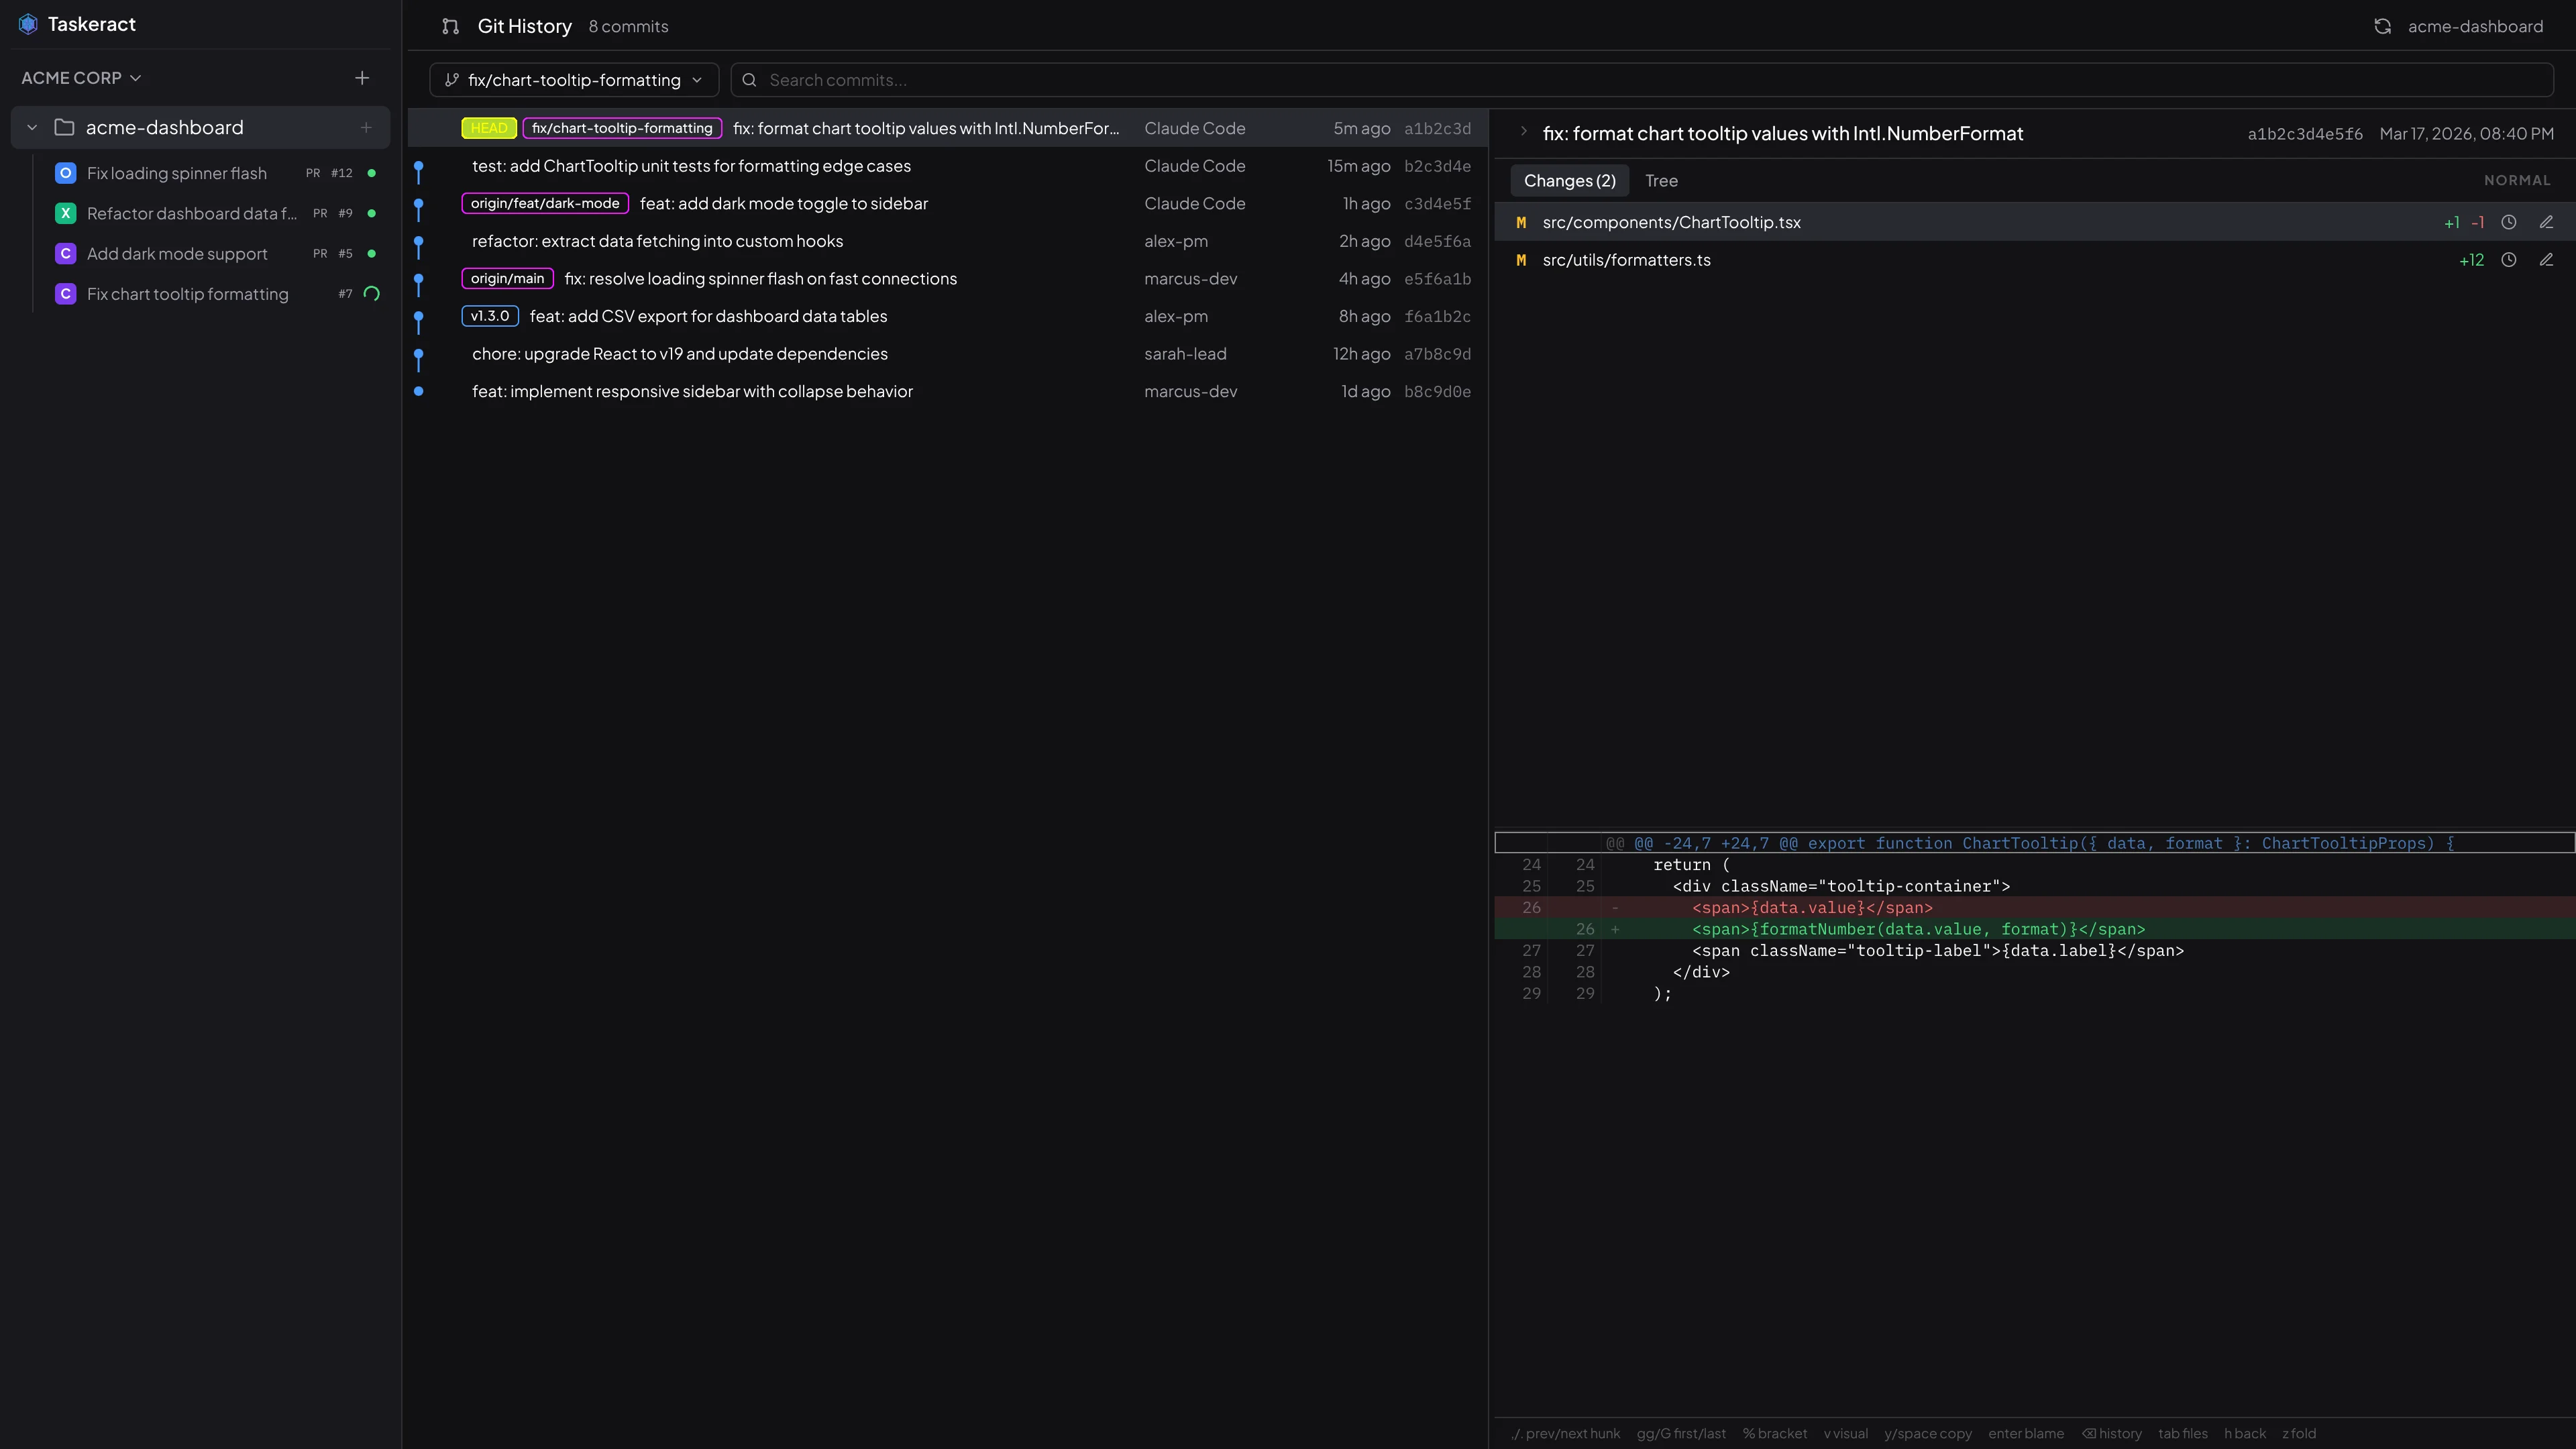
Commit Graph
The left panel shows a visual commit graph with branch and merge lines, author info, timestamps, and commit messages. Use the branch dropdown to filter by any local or remote branch, navigate with j/k, search with /, and select a commit to view its details. When viewing a remote branch that doesn't have a session yet, a Create Session button appears so you can start working on that branch directly.
Commit Detail
The right panel shows the selected commit's metadata in a compact header - the first line of the commit message, hash, and timestamp. Press z or click the chevron to expand the full message, author, and parent links. Below the header are two tabs:
- Changes - lists all files modified in the selected commit with color-coded status indicators (added, modified, deleted, renamed). Select a file to view its syntax-highlighted diff, or a visual preview for image files. Navigate diff hunks with
,/.. Switch between Semantic and Unified views withShift+D. - File Tree - browse the repository's complete file tree at the selected commit. Expand directories, select files to view their full content with syntax highlighting or as an image preview.
Keyboard Navigation
Both tabs support full vim-style keyboard navigation:
j/kto move the cursor (prefix with count, e.g.5j).gg/Gto jump to the first/last row.%to jump to the matching bracket (in code/diff views).vto enter visual selection mode.yorSpaceto copy selected lines to the clipboard.Tabto switch between the file list and content viewer.hto go back to the file list.,/.to jump between diff hunks (Changes tab).h/lto switch between Changes and File Tree tabs.Enterto toggle blame view for the selected file.Backspaceto toggle file history for the selected file.zto toggle the commit message between a single-line summary and the full expanded view.
Blame View
Press Enter on any file to open a line-by-line blame view showing which commit last modified each line, along with the author and date. Adjacent hunks from different commits are color-coded with alternating intensity for easy visual separation.
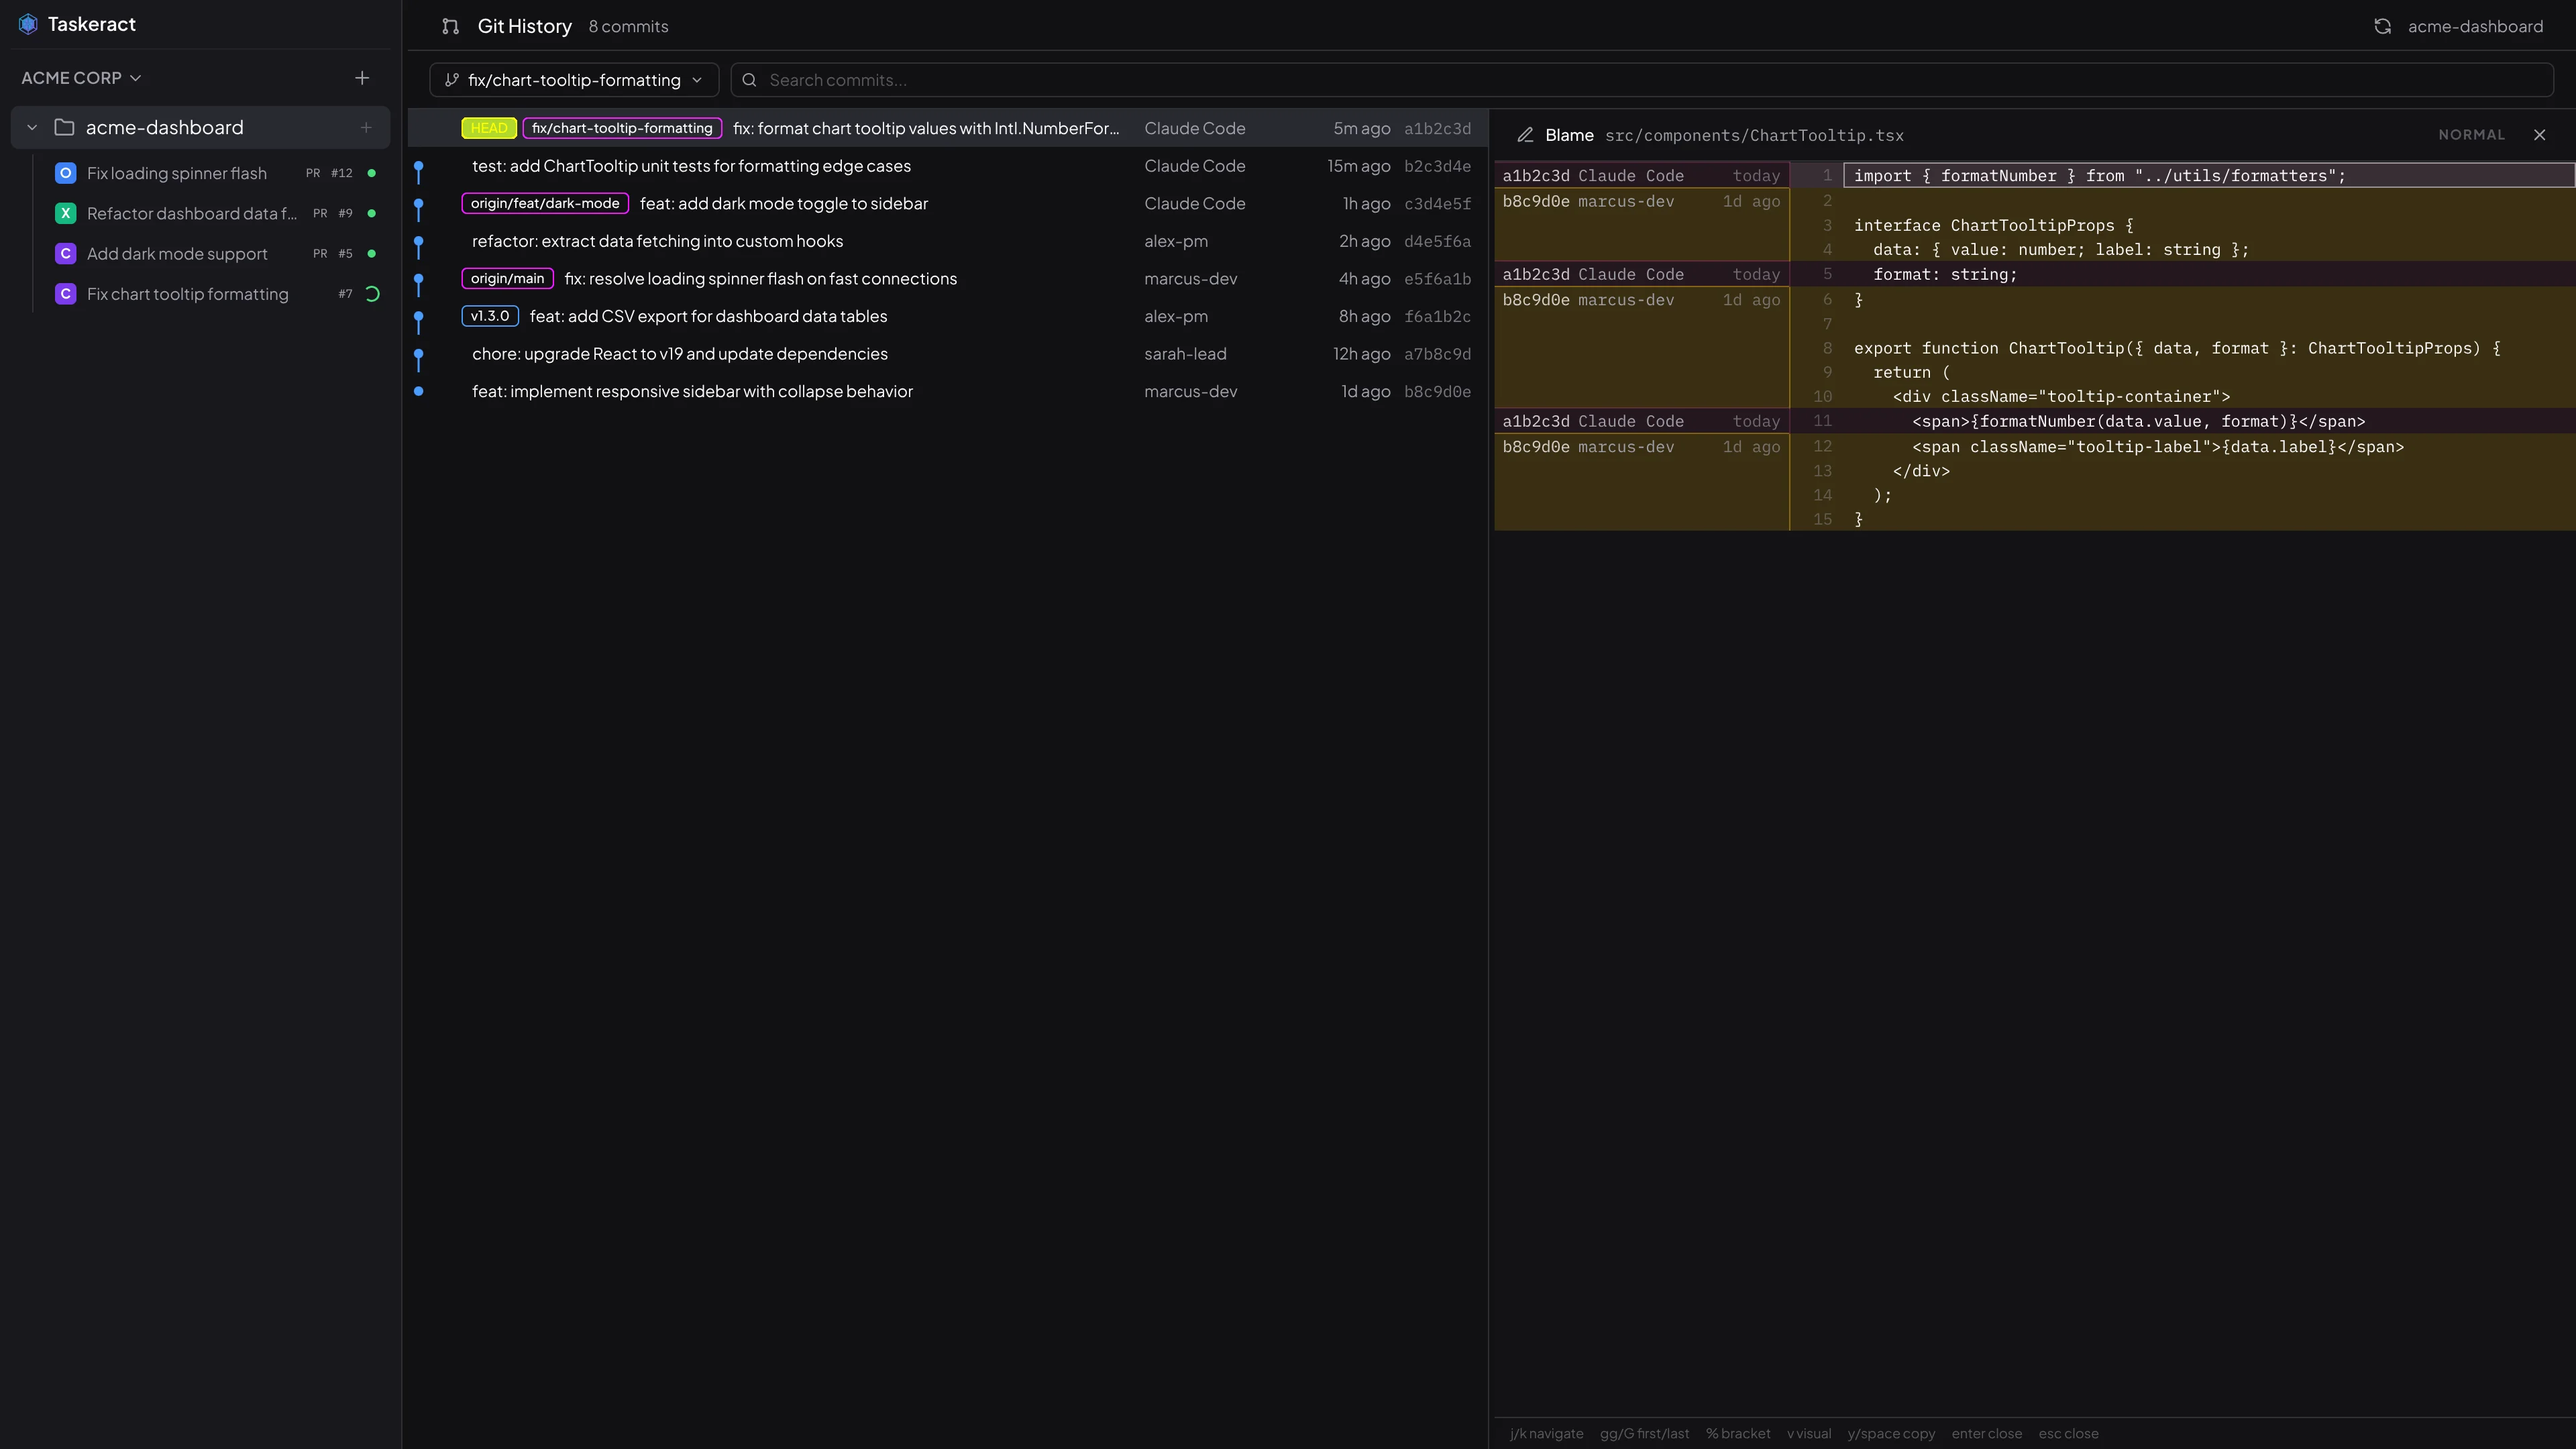
The blame view has its own vim-style keyboard navigation that operates on the code side only (blame annotations are not included in selections or copies):
j/kto move the cursor through lines (prefix with count, e.g.5j).gg/Gto jump to the first/last line.%to jump to the matching bracket.vto enter visual selection mode.yorSpaceto copy selected code lines to the clipboard.- Click a commit hash to navigate to that commit in the graph.
EnterorEscto close the blame view and return to the file list.
File Tree
The File Tree tab shows the full repository tree at the selected commit. Dot-prefixed directories (e.g. .github, .vscode) are collapsed by default. Press Backspace on a file to view its commit history in the graph.
Resizable Panels
Both the graph/detail split and the file list/content split can be resized by dragging. Positions are persisted in your config.yaml and restored on next launch.
Merge Conflicts
When a rebase or merge produces conflicts, Taskeract detects them automatically and switches to the Changes tab. A banner at the top of the session shows the operation in progress, how many files are conflicted, and buttons to continue or abort.
Per-File Resolution
Conflicted files appear with a C status in the file tree. Select a conflicted file to see its diff and a toolbar with resolution options:
- Accept Ours (
o) - discard the incoming changes and keep your version of the file. - Accept Theirs (
t) - discard your changes and use the incoming version of the file. - Agent (
a) - send the file to your agent with a prompt asking it to resolve the conflicts. The agent sees the file contents and works in the terminal to produce a clean merge. - Tool (
e) - open the file in your configured external merge tool (e.g., KDiff3, Beyond Compare, Meld). The tool receives the base, ours, theirs, and working-copy versions of the file. Not available when using Web Remote. - Mark Resolved (
r) - accept the current working copy as the resolved version. Use this after an agent or merge tool has edited the file to your satisfaction.
Agent + Tool Workflow
The resolution options are not mutually exclusive. A common workflow is to let the agent handle the straightforward conflicts first, then open the remaining ones in an external merge tool for manual review. When the merge tool opens, it starts from the working copy that already contains the agent's edits, so no work is lost. Once you're satisfied with the result, use Mark Resolved to stage the file.
Bulk Agent Review
When multiple files are conflicted, an Agent Review All button (Shift+A) appears. This sends every conflicted file to the agent in a single prompt, letting it work through all of them at once.
Continuing or Aborting
The conflict banner at the top of the session has two actions:
- Continue - resume the merge or rebase after all conflicts have been resolved. Disabled while any files remain conflicted.
- Abort - cancel the merge or rebase and return to the previous state.
External Merge Tool
Configure your preferred merge tool in Settings > Appearance. Taskeract auto-detects tools installed on your system (KDiff3, Beyond Compare, Meld, P4Merge, DeltaWalker, WinMerge, FileMerge, Vimdiff) and lists them in a dropdown. Three-way merge tools are preferred. If no tool is configured, Taskeract uses the first available one automatically.
PR Review
Review pull requests from GitHub, GitLab, and Bitbucket without leaving the app. Leave inline comments, track feedback as a checklist, and approve or request changes.
Pull Requests in the Sidebar
Projects using the Pull Request integration mode show a Pull Requests section in the sidebar when there are open PRs. Click any PR to open it in the review view. PRs that already have a session are shown under their session instead.
Starting a PR Review
Hover over a PR in the sidebar and click + to start a review on that PR. Pick an agent and Taskeract provisions a local workspace on the latest PR head. Review-only sessions show a Review only badge, refresh to the current PR branch, and do not create synced checkpoints or publish branches.
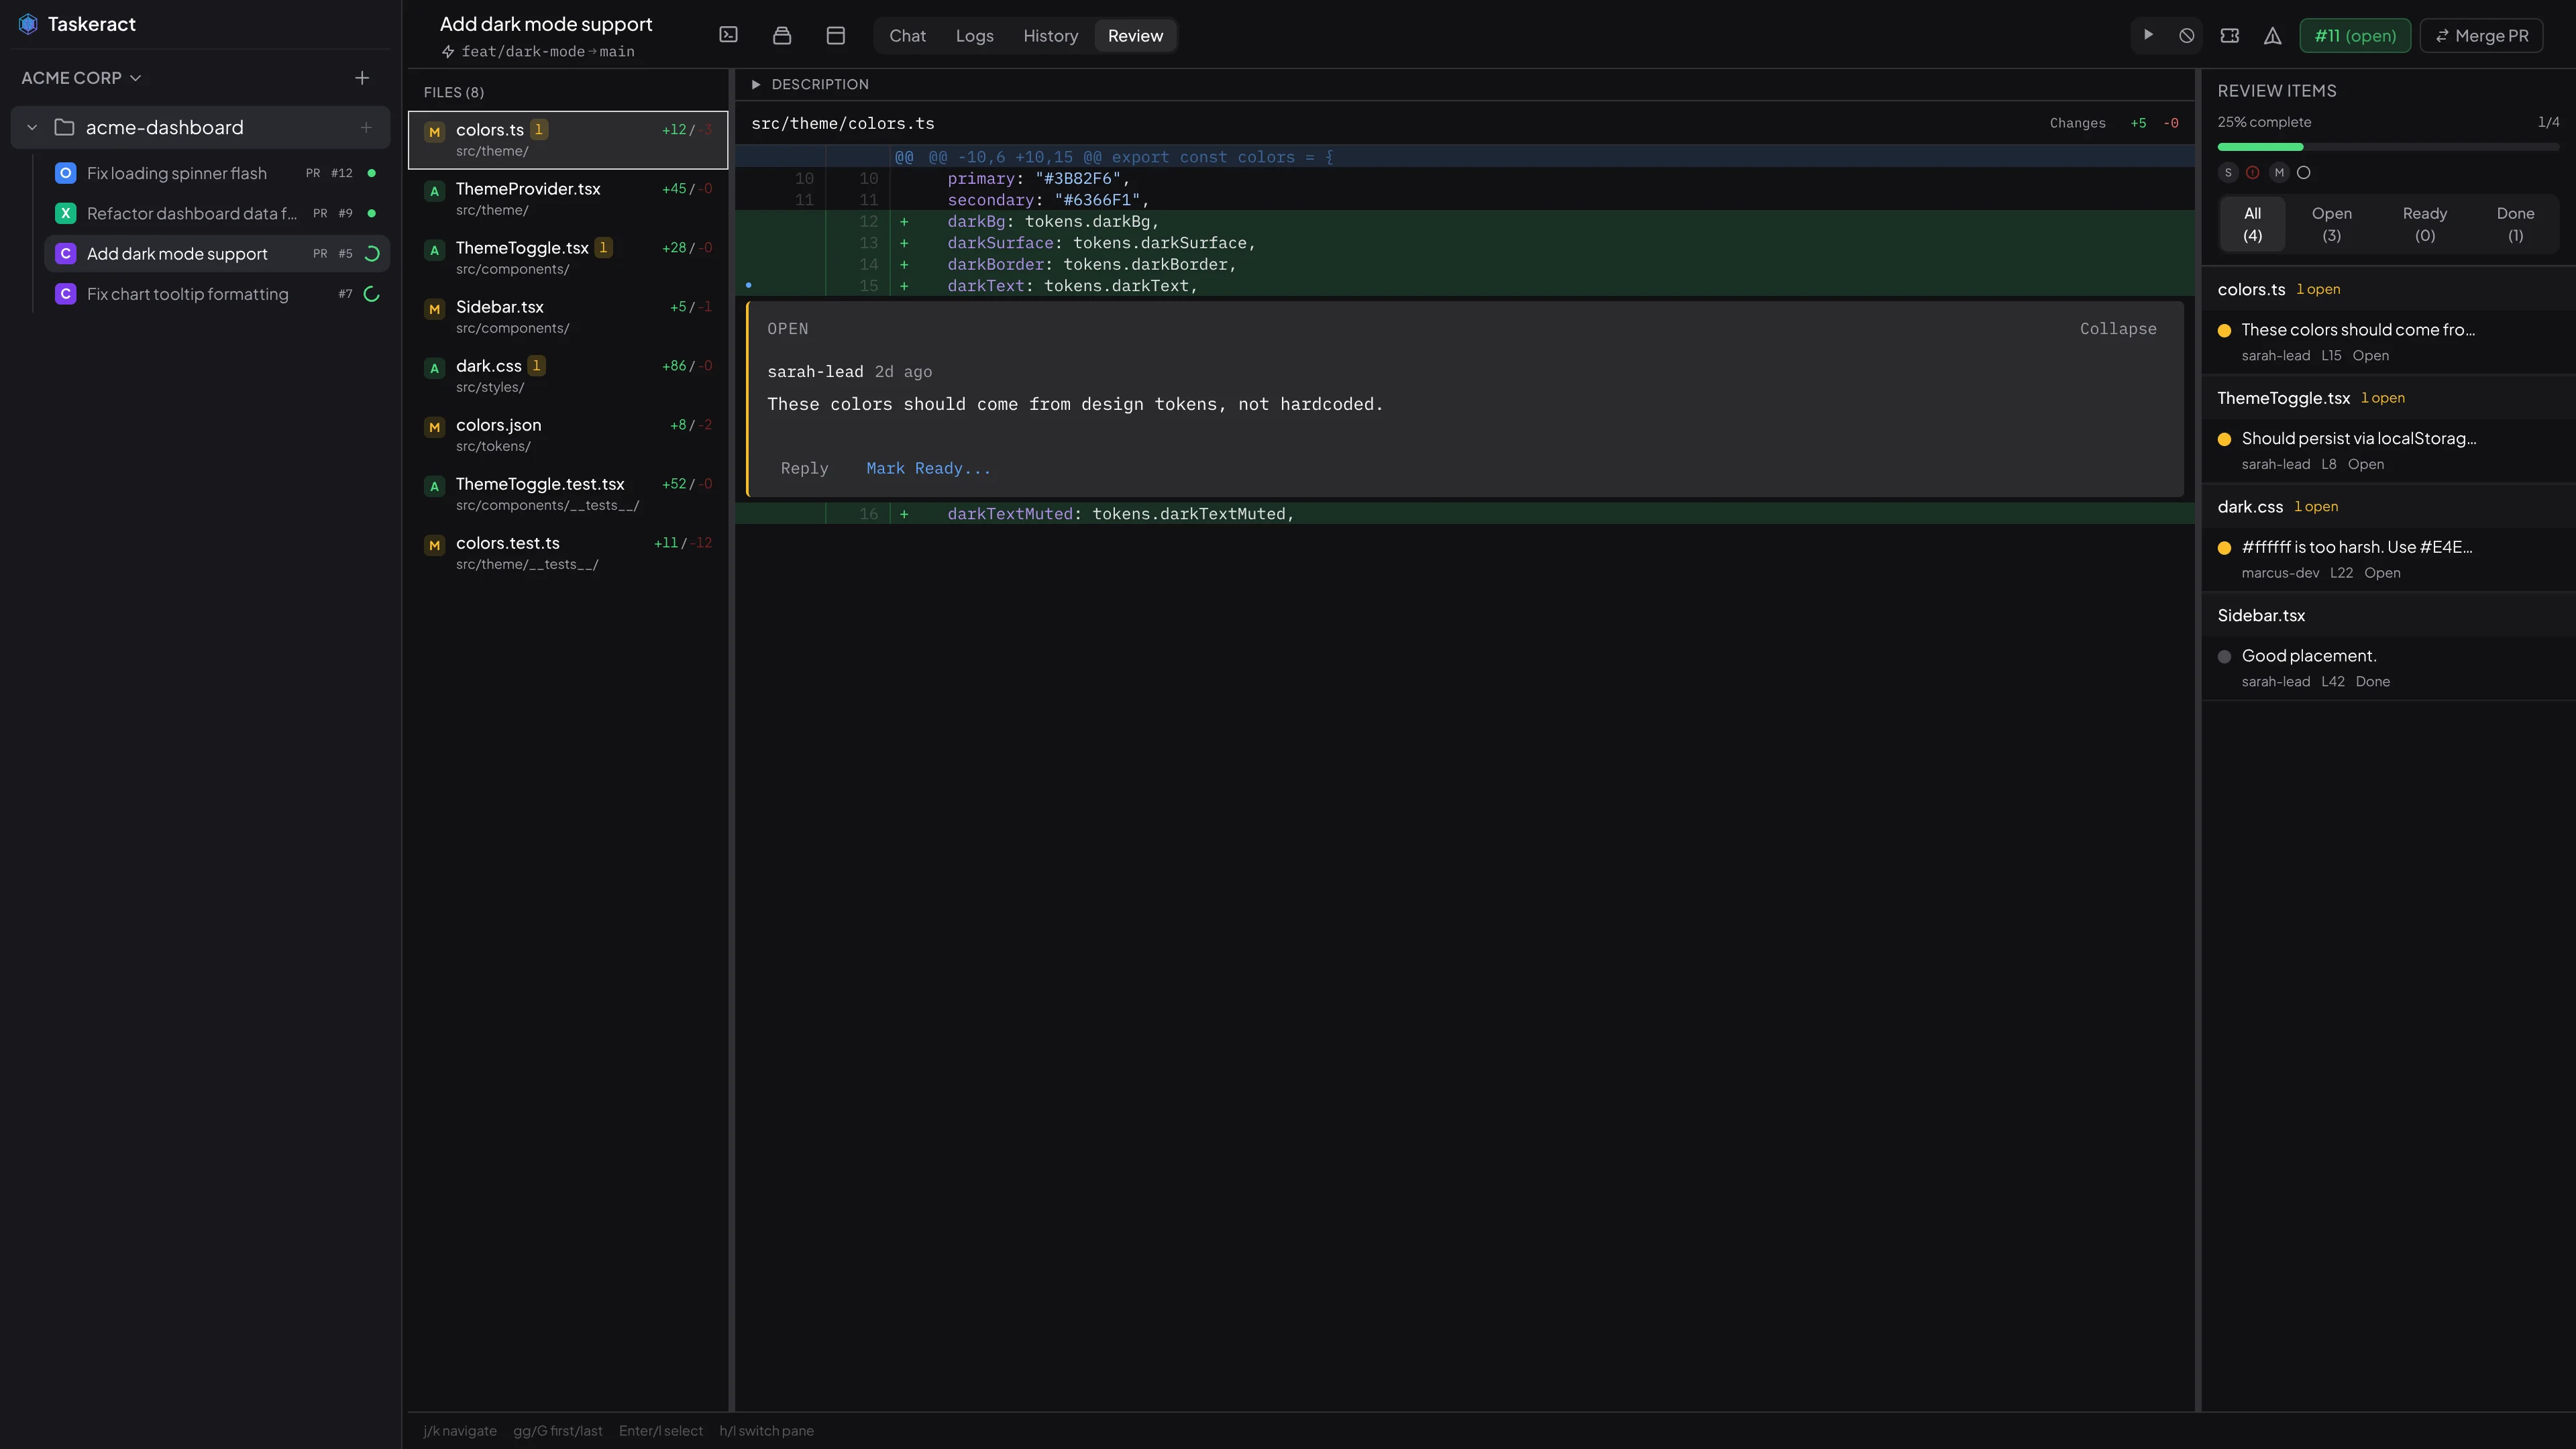
Review Tab
The Review tab gives you the full review experience inside a session - file list, diff, and checklist side by side. You can leave comments, track threads, and work with your agent without switching windows.
Thread Bar
While working in the terminal or other tabs, click the comment icon in the session header to open the thread bar. It shows all review threads in a side panel so you can keep an eye on feedback without leaving what you're doing. When the thread bar is open on the terminal tab, each comment has a Paste to agent button that sends the comment text straight into the terminal.
Layout
The review view has three resizable panes:
- File List (left) - changed files with status icons and line counts. Click a file to view its diff.
- Diff Viewer (center) - the selected file's diff with syntax highlighting and full vim-style keyboard navigation (
j/k,gg/G,%, numeric counts). Usevfor visual selection andyorSpaceto copy selected lines. Jump between hunks with,/., search with/orMod+F, and toggle between the changed hunks and the full file withf. A collapsible description panel sits above the diff; pressdto toggle it and drag the divider to resize it. Presscor hover over a line and click+to add a comment. Comment threads appear inline below the lines they reference. - Review Checklist (right) - reviewers with their approval status, followed by all comment threads as a to-do list grouped by file, with a progress bar and filter tabs. Click an item to jump to it in the diff.
Drag the dividers between panes to resize them. Positions are saved automatically.
Inline Comments
Hover over any line in the diff and click the + icon to write an inline comment. Two submit buttons let you choose how to post: Add Issue (Mod+Enter) creates actionable feedback tracked in the review workflow, while Add Comment (Mod+Shift+Enter) posts an informational note that is immediately resolved. Press Escape to cancel. The comment appears immediately below that line.
Thread Workflow
Each comment thread has three states:
- Open - feedback has been left and needs the developer's attention.
- Ready for Review - the developer has addressed the feedback and is waiting for the reviewer to verify.
- Completed - the reviewer has signed off. The thread is resolved on GitHub/GitLab/Bitbucket and collapses in the diff.
A thread is only resolved on the provider when the reviewer signs off, so feedback is never dismissed prematurely.
Actions
What you can do depends on whether you're the PR author or a reviewer:
- Reply - add a follow-up comment to any thread.
- Mark Ready (PR author) - signal that you've addressed the feedback. Requires a comment explaining what was done. Available on open threads.
- Sign Off (reviewer) - approve the change and resolve the thread. Requires a comment, which is posted as a reply before resolving. Only available on "Ready" threads.
- Reject (reviewer) - reopen a "Ready" thread. Requires a comment about what still needs work.
Quick action buttons in the checklist and keyboard shortcuts (r, o, x) open the thread detail pane so you can write the required comment before the action is performed.
Approving a PR
The header shows the PR number, title, branches, diff stats, and CI status. Two buttons let you submit a formal review:
- Approve - submit an approving review.
- Request Changes - write a summary and submit a "changes requested" review.
An Open in Browser link is available if you need to visit the PR on GitHub, GitLab, or Bitbucket directly.
Staying Up to Date
Taskeract updates review threads immediately for comments and status changes made from Taskeract, and keeps polling pending CI checks while the review view is open. Use the header Refresh button to pull in provider-side changes made outside Taskeract.
Agent Access to Review Threads
When a session is connected to a pull request, your agent can read and interact with review threads directly. Ask your agent to "check the review feedback" or "address the review comments" and it will see every thread - status, file locations, diff context, and the full conversation - so it can work through the feedback without you having to copy and paste anything.
Agents can also create new inline comments on specific lines (as issues or informational comments), reply to existing threads, mark threads as ready, sign off on threads, reject threads, and resolve threads. For example, you can ask your agent to "add a review comment on line 42 of src/main.rs" or "mark thread X as ready with a note about the fix." All actions require a comment, matching the same workflow enforced in the UI. Changes are reflected on GitHub, GitLab, or Bitbucket and in Taskeract's Review tab.
Agent Access to CI/CD Status
Agents can check build status and diagnose CI/CD failures directly. Ask your agent "are the builds passing?" or "check CI status" to get a summary of all checks for the current commit. To investigate a failure, ask "show me the build log for <check name>" and the agent will fetch the actual log output to help diagnose what went wrong. Works with GitHub Actions, GitLab CI, and Bitbucket Pipelines.
Merging a PR
When a session has an open pull request, a Merge PR button appears in the session header while the Review tab is active. Click it or press Mod+M to merge the pull request directly on your hosting provider (GitHub, GitLab, or Bitbucket) without leaving the app. If you do not choose a merge strategy in Taskeract, the merge uses your provider's default.
The merge panel shows the PR number, title, and branch direction. If the session is linked to an issue, a status picker lets you transition the issue to a new status as part of the merge. The available statuses come from your issue tracker's workflow, so you only see transitions that are actually valid. The chosen status is remembered per-project, so subsequent merges pre-select the same status.
A Delete branch after merge checkbox deletes the source branch on the hosting provider after a successful merge. This is useful for keeping your remote clean. A Close session after merge checkbox automatically deletes the session after the merge completes. When close-session is enabled, a remembered Squash into one commit checkbox appears; if you have not chosen a squash preference for the project yet, it is selected by default. These preferences are remembered per-project. If the PR targets the production branch and a development branch is configured, the backmerge suggestion appears after the merge completes, just like it does for Merge & Push. If Promote after merge is enabled, the development branch is automatically promoted to production after the merge.
Issue Tracking
Taskeract integrates with popular issue trackers so you can browse issues, start sessions linked to tickets, and give your agents direct access to issue details.
Supported Trackers
- GitHub Issues - uses your existing GitHub account token.
- GitLab Issues - uses your existing GitLab account token.
- Jira - requires an Atlassian API token (from id.atlassian.com).
- Linear - requires an API key (from linear.app/settings).
- Trello - requires an API key and user token (from trello.com/power-ups/admin).
- Taiga - requires a username and password (exchanged for an auth token on save). User stories with swimlane assignments are supported.
Enabling Issue Tracking
Open Project Properties > Issues. Select your tracker type and provide any project-specific configuration (e.g. Jira project key, Linear team key, or Trello board ID). For GitHub and GitLab, the tracker uses your existing account token automatically. For external trackers (Jira, Linear, Trello, Taiga), add your credentials in Settings > Accounts first, then select which account to use from the Account dropdown. If you have only one matching account, it is selected automatically. For Taiga, selecting an account loads your projects into a dropdown so you can pick the correct one.
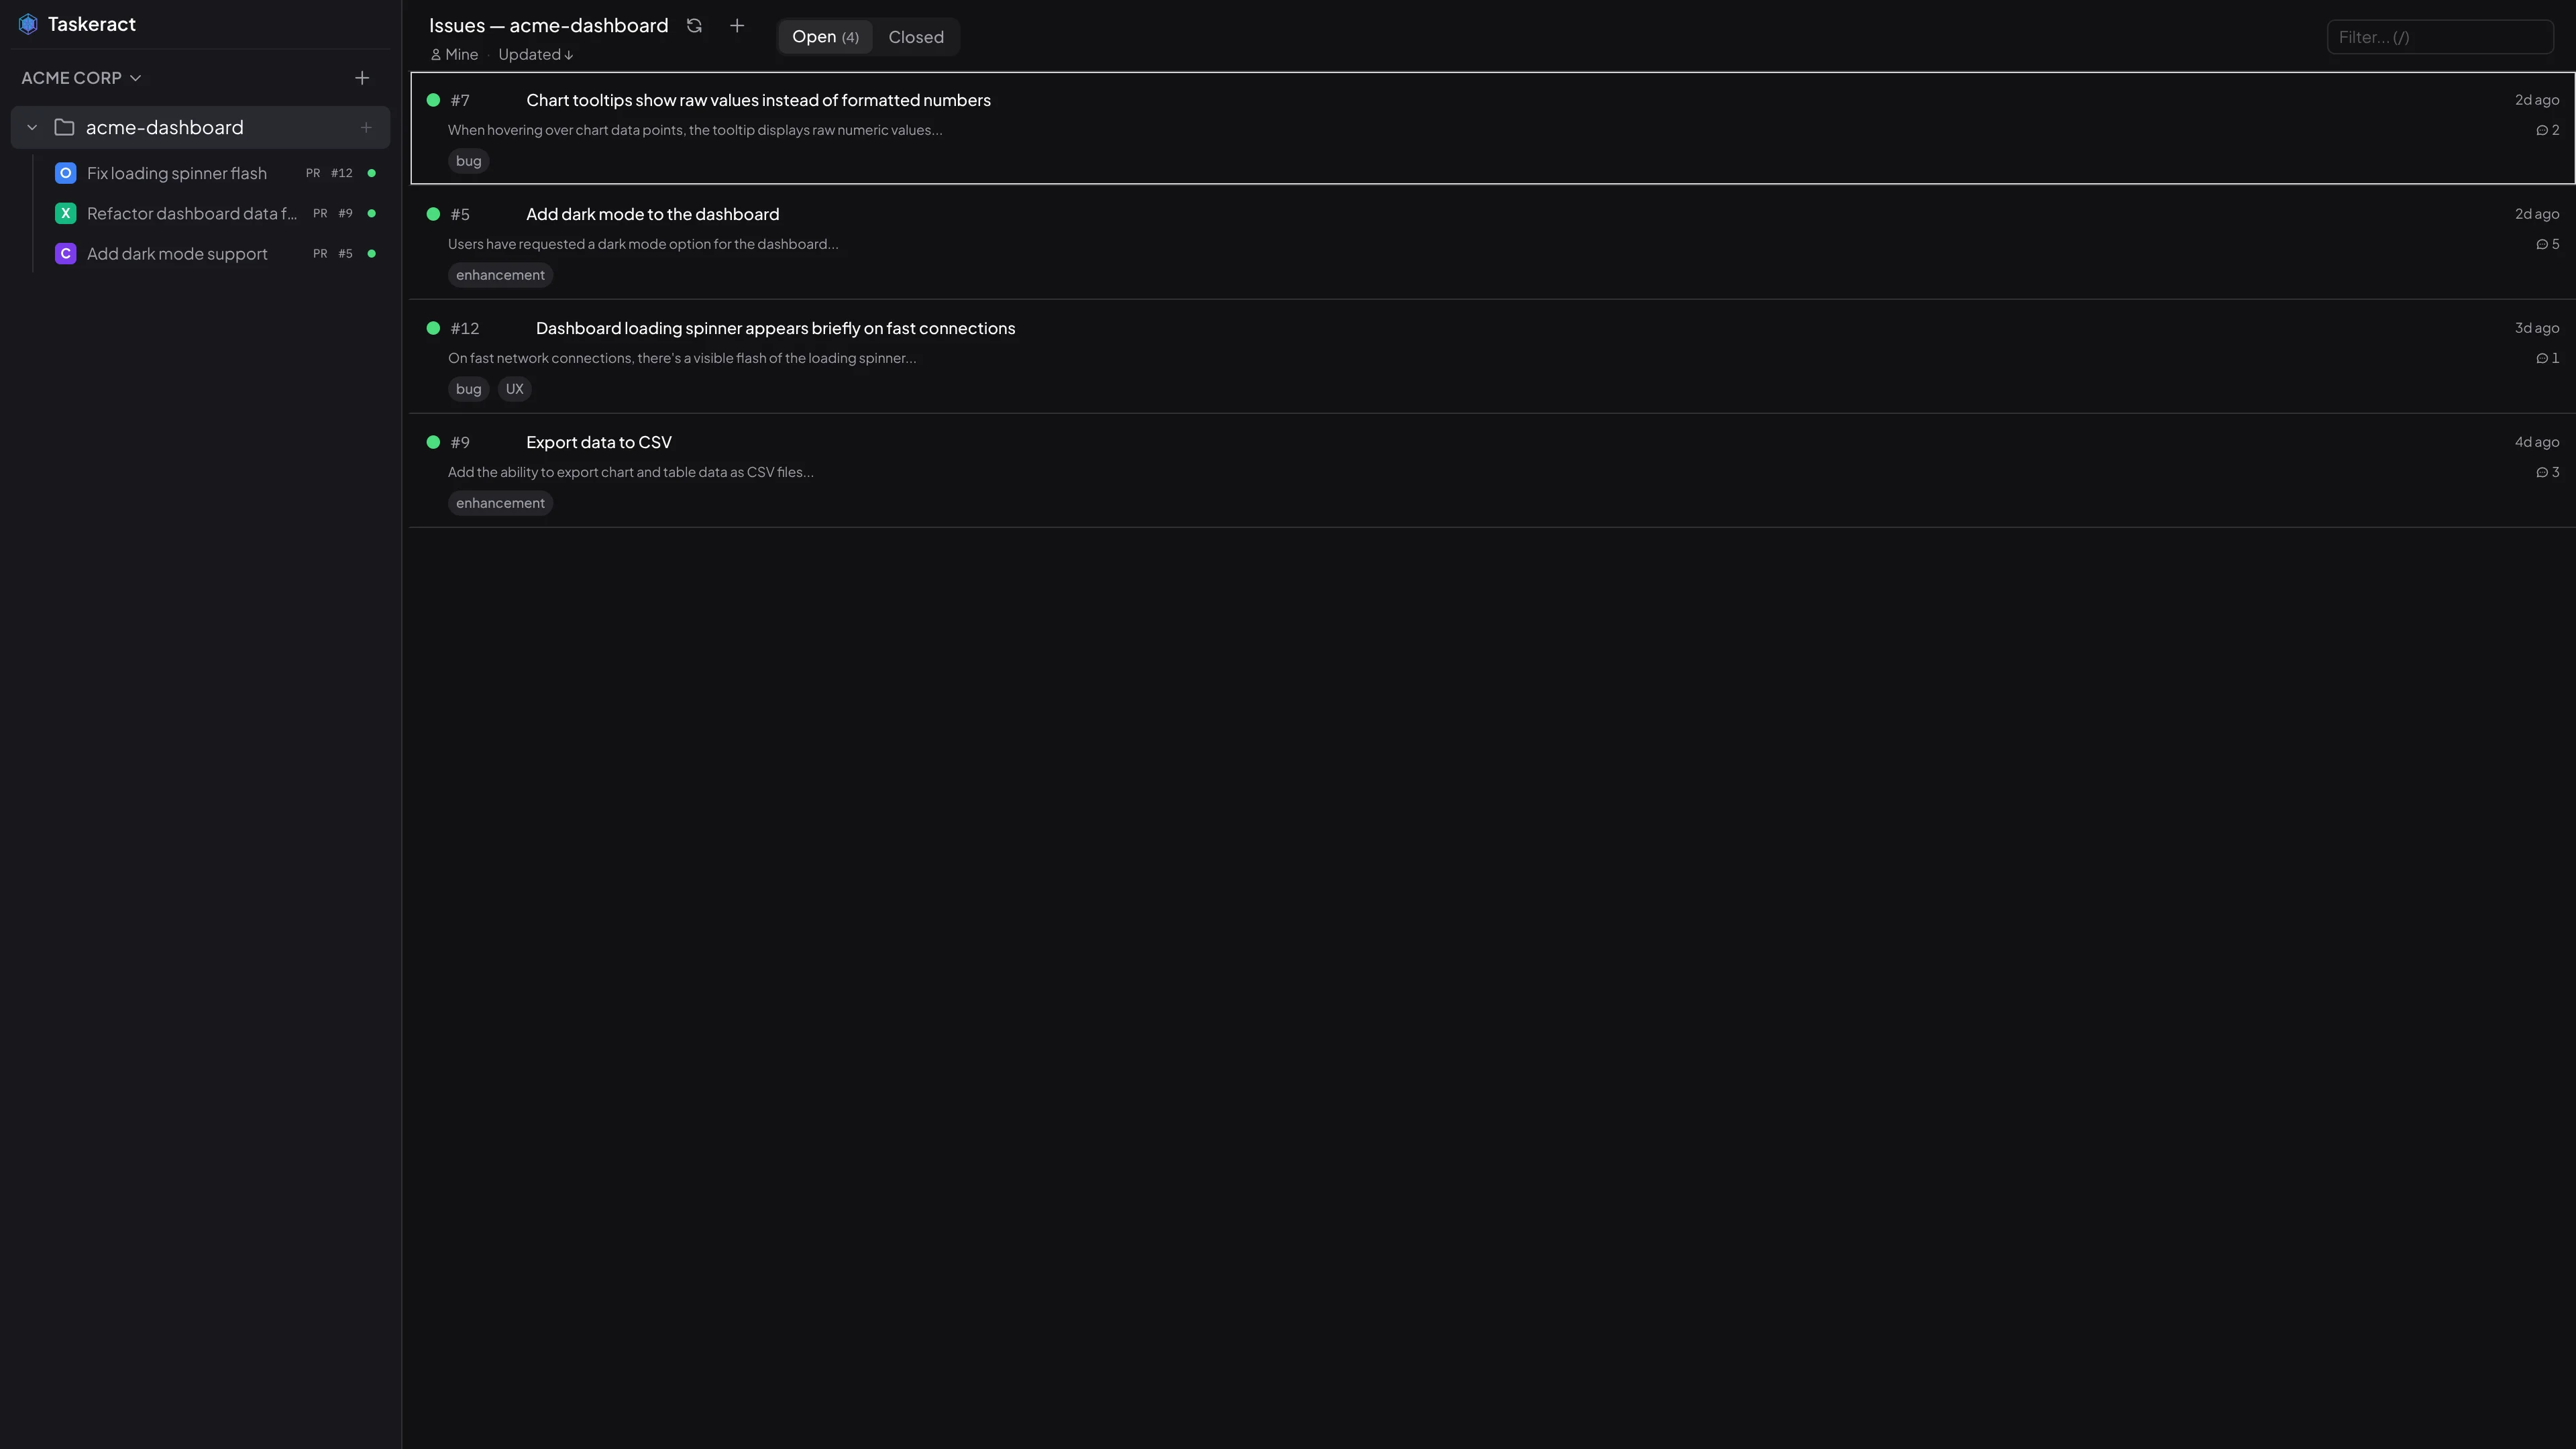
Browsing Issues
With issue tracking enabled, an Issues view is available. Click a project name in the sidebar or use Jump Mode (;) to open it.
The header shows a row of status filter pills. For trackers with rich workflow statuses - Jira, Linear, Trello, and Taiga - the pills reflect the platform's actual statuses (e.g., "To Do", "In Progress", "In Review", "Done"). For GitHub and GitLab, the pills show Open and Closed. Click a pill to filter issues to that status. A Mine toggle filters the list to only issues assigned to you.
Status Groups
Trackers like Jira can have many workflow statuses, making the pill bar unwieldy. Status groups let you define named subsets of statuses so you can quickly switch between different views - for example, a "Dev" group with just the statuses you care about and a "QA" group with testing statuses.
Define status groups in Project Properties > Issues. When at least one group is defined, a group selector appears before the status pills in the Issues view. Click it to switch groups or select All to see every status. Each group can contain up to 9 statuses (matching the jump dialog's 1–9 keys). Your selected group is remembered per project. If you haven't chosen one yet, the group marked as default is used.
Status groups are stored in .tact/project.yaml and synced to team members automatically.
The view shows issues with their ID, title, labels, assignees, and status. The active status pill shows how many issues are loaded, with a + suffix when more pages are available. Each issue includes a body preview and comment count so you can scan what issues are about and how active they are without opening them. Use the sort dropdown to order by updated or created date. The list loads more issues automatically as you scroll. Click any issue to see its full description and comments in a resizable detail panel. Use j/k to navigate (with numeric prefix, e.g. 5j), gg/G to jump to the first/last issue, Enter to select, Escape to close, / to filter, and s to start or go to a session. The search field includes a clear button when text is entered.
Starting a Session from an Issue
Hover over any issue to reveal an action button next to the issue ID. If no session exists, a + button starts a new session linked to that issue. The session's branch is automatically named after the issue (e.g. feature/42 or feature/PROJ-123), and the issue is auto-assigned to you on the tracker. If a session already exists, an external-link icon appears instead, letting you jump directly to that session. You can also press s on a focused issue to start or go to a session without using the mouse.
Linking an Existing Session to an Issue
You don't have to start a session from the Issues view to connect it to a ticket. When issue tracking is configured for a project, every session without an issue shows a dimmed ticket icon in the header. Click it to pick an open issue from your tracker and link it to the session. Once linked, the session behaves the same as one created from an issue - the sidebar toggle and agent access to issue details are both available.
Issue Sidebar in Sessions
When a session is linked to an issue, the ticket icon in the session header lights up. Click it to toggle an issue detail sidebar alongside your work. The sidebar shows the issue title, state, metadata (assignees, priority, labels, milestones, and other tracker-specific fields), description, and comments in a read-only view. Click the Edit button or press e to open the full issue editor. Drag the sidebar edge to resize it - your preferred width is saved automatically. A Paste to agent button on each comment lets you send content directly to the terminal.
Creating Issues
Press c in the Issues view or click the + button to open the issue editor in create mode. A full-page form appears with a large title input and a two-column layout: a markdown editor on the left and a metadata panel on the right. The description editor has Write and Preview tabs - Write shows a formatting toolbar with bold, italic, strikethrough, code, list, divider, and link buttons (plus keyboard shortcuts Mod+B, Mod+I, Mod+E), and Preview renders your markdown in real time. The metadata panel shows all fields your tracker supports - assignees, labels, priority, milestones, due dates, and more. Required fields appear first, with optional fields below a separator. The available fields adapt dynamically to your tracker: a GitHub project shows labels, assignees, and milestones; a Jira project shows issue types, priorities, components, fix versions, and due dates. For multi-select fields like labels and assignees, selected items appear as removable pills. For Jira labels, suggestions from previously used labels appear as you type, and you can also enter new labels freely. For Taiga tags, type and press Enter to add. Press Mod+Enter to create the issue, or Escape to go back. All six supported trackers support creating issues with full field coverage.
Editing Issues
Press e in the issue detail sidebar, or click the Edit button, to open the full issue editor. The editor uses the same full-page layout as creating - title input, markdown editor with Write/Preview tabs and formatting toolbar, and a metadata panel with all tracker-specific fields. All fields are immediately editable without needing to click into each one. Make your changes and click Save or press Mod+Enter, or press Escape to go back without saving. Taskeract checks for conflicts before saving - if someone else modified the issue since you opened it, a dialog offers two choices: Reload their changes or Overwrite with mine.
In edit mode, existing comments appear below the editor as a timeline. You can add a comment from the editor view using the comment input at the bottom of the timeline.
Closing & Reopening Issues
A Close or Reopen button appears next to the issue state in the detail panel. Click it to change the issue state. The detail view and issue list both refresh automatically. For Jira, state changes use the available workflow transitions. For Trello, closing and reopening maps to archiving and unarchiving cards.
Adding Comments
A comment input appears at the bottom of the issue detail panel's comment timeline. Type your comment and click Post Comment or press Mod+Enter to submit. The comment appears immediately in the timeline and is posted to your tracker.
Automatic Status Transitions
When a session is linked to an issue, Taskeract can move the issue through your workflow automatically. The issue status advances when you start working on a session, when you create a pull request, and when you merge. This keeps your issue tracker in sync without manual updates. Status transitions follow the workflow configured in your tracker.
Fetching Any Issue
You can fetch any issue by its ID, not just the one linked to the current session. This is useful when your agent needs to reference related tickets or check the details of a different issue during its work.
Agent Access to Issue Details
When a session is connected to an issue, your agent can read the issue details directly. Ask your agent to "check the issue" or "look at the ticket" and it will see the issue description, labels, and comments so it can understand the requirements without you having to copy and paste anything.
Agents can also create new issues, edit existing ones, close or reopen them, and add comments directly. When creating or editing, agents can set assignees, labels, priority, and custom fields. For example, ask your agent to "create a high-priority bug for the login issue and assign it to me" or "close issue #42 with a comment explaining the fix." This works with all six supported trackers.
Attachments
Issue trackers that support native file attachments - Jira, Trello, and Taiga - display attachments directly in the issue detail sidebar. Image attachments show thumbnail previews; other files show the filename and size.
Viewing Attachments
Open any issue that has attachments and scroll to the Attachments section between the description and comments. Click an attachment to open it in your browser. Images display a thumbnail preview; other file types show a document icon with the filename.
Uploading Attachments
You can upload files in two ways:
- Drag and drop - drag files onto the drop zone in the attachments section.
- File picker - click Attach in the section header to browse for files. You can select multiple files at once.
Uploaded files appear immediately in the attachment grid.
Deleting Attachments
Hover over an attachment and click the × button to delete it. Deletions take effect immediately on the remote issue tracker.
Unsupported Providers
GitHub, GitLab, and Linear do not have native issue attachment APIs. For these providers, the attachments section is hidden.
File Attachments
You can attach images, videos, and documents to issue comments and pull request review replies. Attachments are uploaded to your configured storage provider and inserted as markdown into the comment body.
Attaching Files
There are three ways to attach files:
- Drag and drop - drag files from your file manager onto the comment text area. The entire text area is a drop target.
- Paste from clipboard - paste a screenshot or copied image directly into the text area. The image is uploaded automatically.
- File picker - click the Attach button below the text area to browse for files. You can select multiple files at once.
Supported file types include images (PNG, JPEG, GIF, WebP, SVG), videos (MP4, WebM, MOV), and documents (PDF, TXT, Markdown, CSV).
Upload Progress
While files are uploading, the attach bar shows an upload indicator. You can continue typing or attach additional files - each completed upload inserts its markdown reference at the cursor position immediately.
GitLab Projects
For GitLab projects, images are uploaded directly through GitLab's native upload API. No separate storage provider is needed for inline images in GitLab issue and merge request comments.
Other Providers
For GitHub, Bitbucket, Jira, and other providers, you need to configure an S3-compatible storage provider in Settings > Accounts. Uploaded files are stored in your bucket and referenced via URL in the comment markdown.
Branch Promotion
When your project has separate development and production branches, Taskeract can merge between them directly. Since the app controls git authentication, this is the easiest way to promote changes from development to production or backmerge hotfixes from production into development.
Promote & Backmerge
Open the Git History Viewer and select a branch. When both development and production branches are configured for the project:
- Promote to Production appears when the development branch is selected. This merges the development branch into the production branch and pushes the result.
- Backmerge to Development appears when the production branch is selected. This merges the production branch back into the development branch and pushes the result.
Both operations verify that local branches are in sync with the remote before proceeding. If either branch has unpushed commits or is behind the remote, the operation is blocked with a clear explanation.
Version Tagging
For projects with straightforward versioning, Taskeract can bump version numbers as part of the promotion flow. Enable this in Project Properties > Git > Release by detecting or adding your version files (e.g., package.json, Cargo.toml, pyproject.toml).
When version files are configured and you promote to production, the dialog shows the current version and lets you pick a bump type - patch, minor, major, or a custom version string. The promotion then:
- Bumps the version in all configured files and commits to the development branch.
- Pushes the development branch.
- Merges the development branch into production.
- Pushes the production branch.
- Creates an annotated git tag (e.g.,
v1.2.3).
The tag prefix defaults to v and can be changed in the Release settings. If you promote without version files configured but Taskeract detects version files in the project, a banner suggests enabling version tagging.
Auto-Promote After Merge
When Promote after merge is enabled in the merge dialog, merging a session into the development branch automatically promotes those changes to the production branch. If version files are configured, the promotion dialog opens so you can choose a version bump. Otherwise, the promotion happens silently and a progress indicator shows in the merge button. This option requires Close session after merge to be enabled.
Hotfix Backmerge
When you merge a session that targets the production branch (via Merge & Push or Merge PR), Taskeract suggests backmerging production into development to keep the branches in sync. This avoids the common problem of hotfixes being lost when the next promotion happens. If Close session after merge is enabled, the session closes after the backmerge completes or is skipped, but stays open if the backmerge fails so you can resolve any issues.